
Crimson Desert Chapter 4: The Price of Knowledge Gameplay Guide Walkthrough
This page is a complete guide of the Chapter 4 Crimson Desert. It includes all the main missions. Check out the full video gameplay guide with step by step instructions below and please leave us a comment and follow us on youtube if it helped you. Thanks so much for checking out our stuff!
Chapter 4: The Price of Knowledge
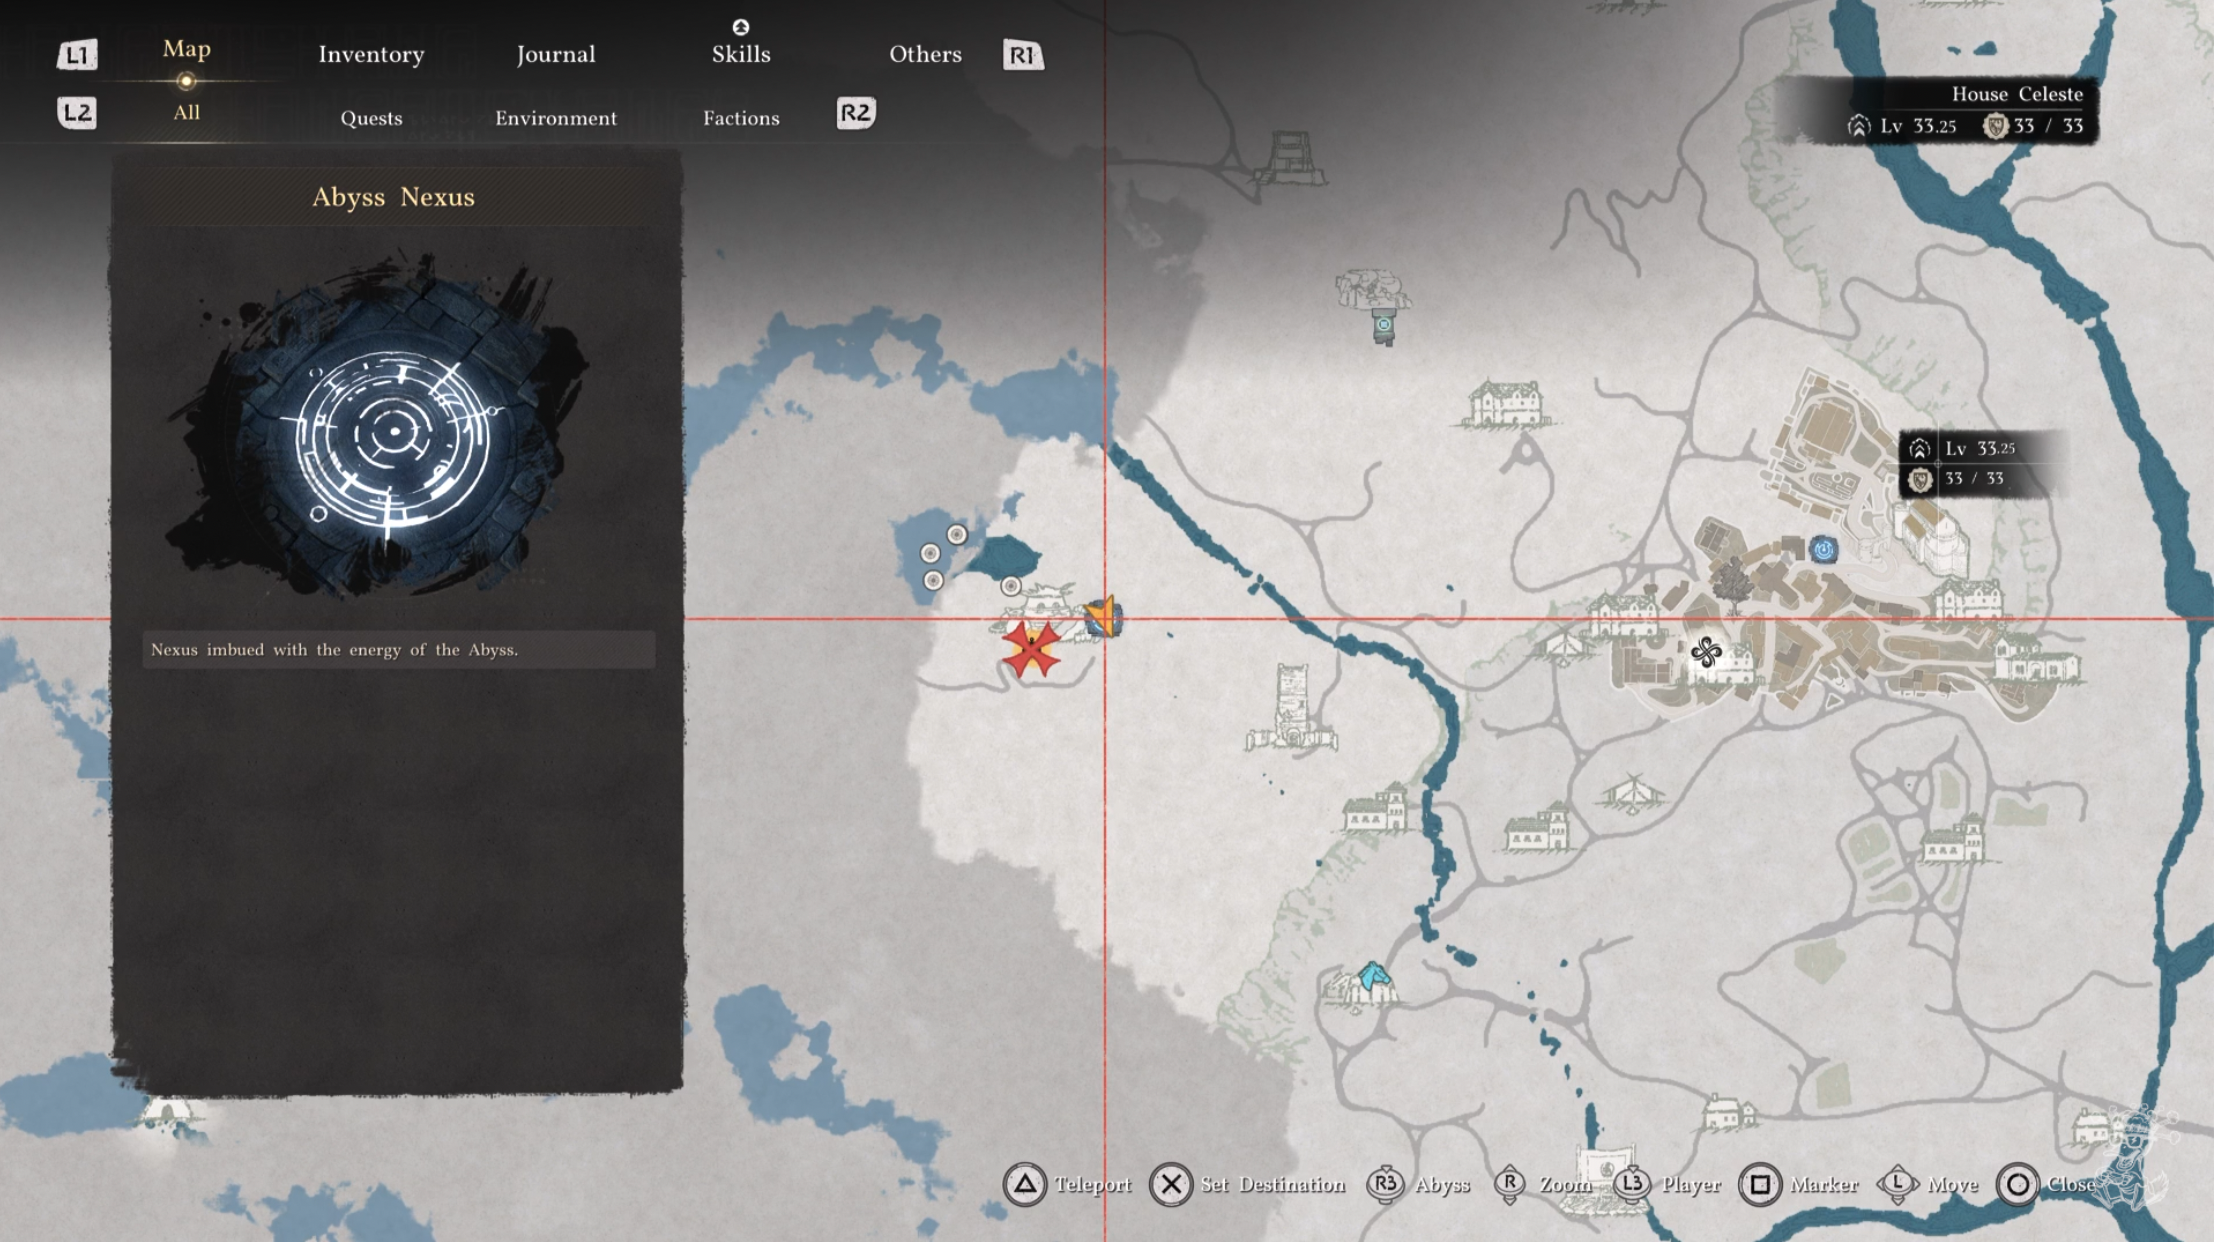
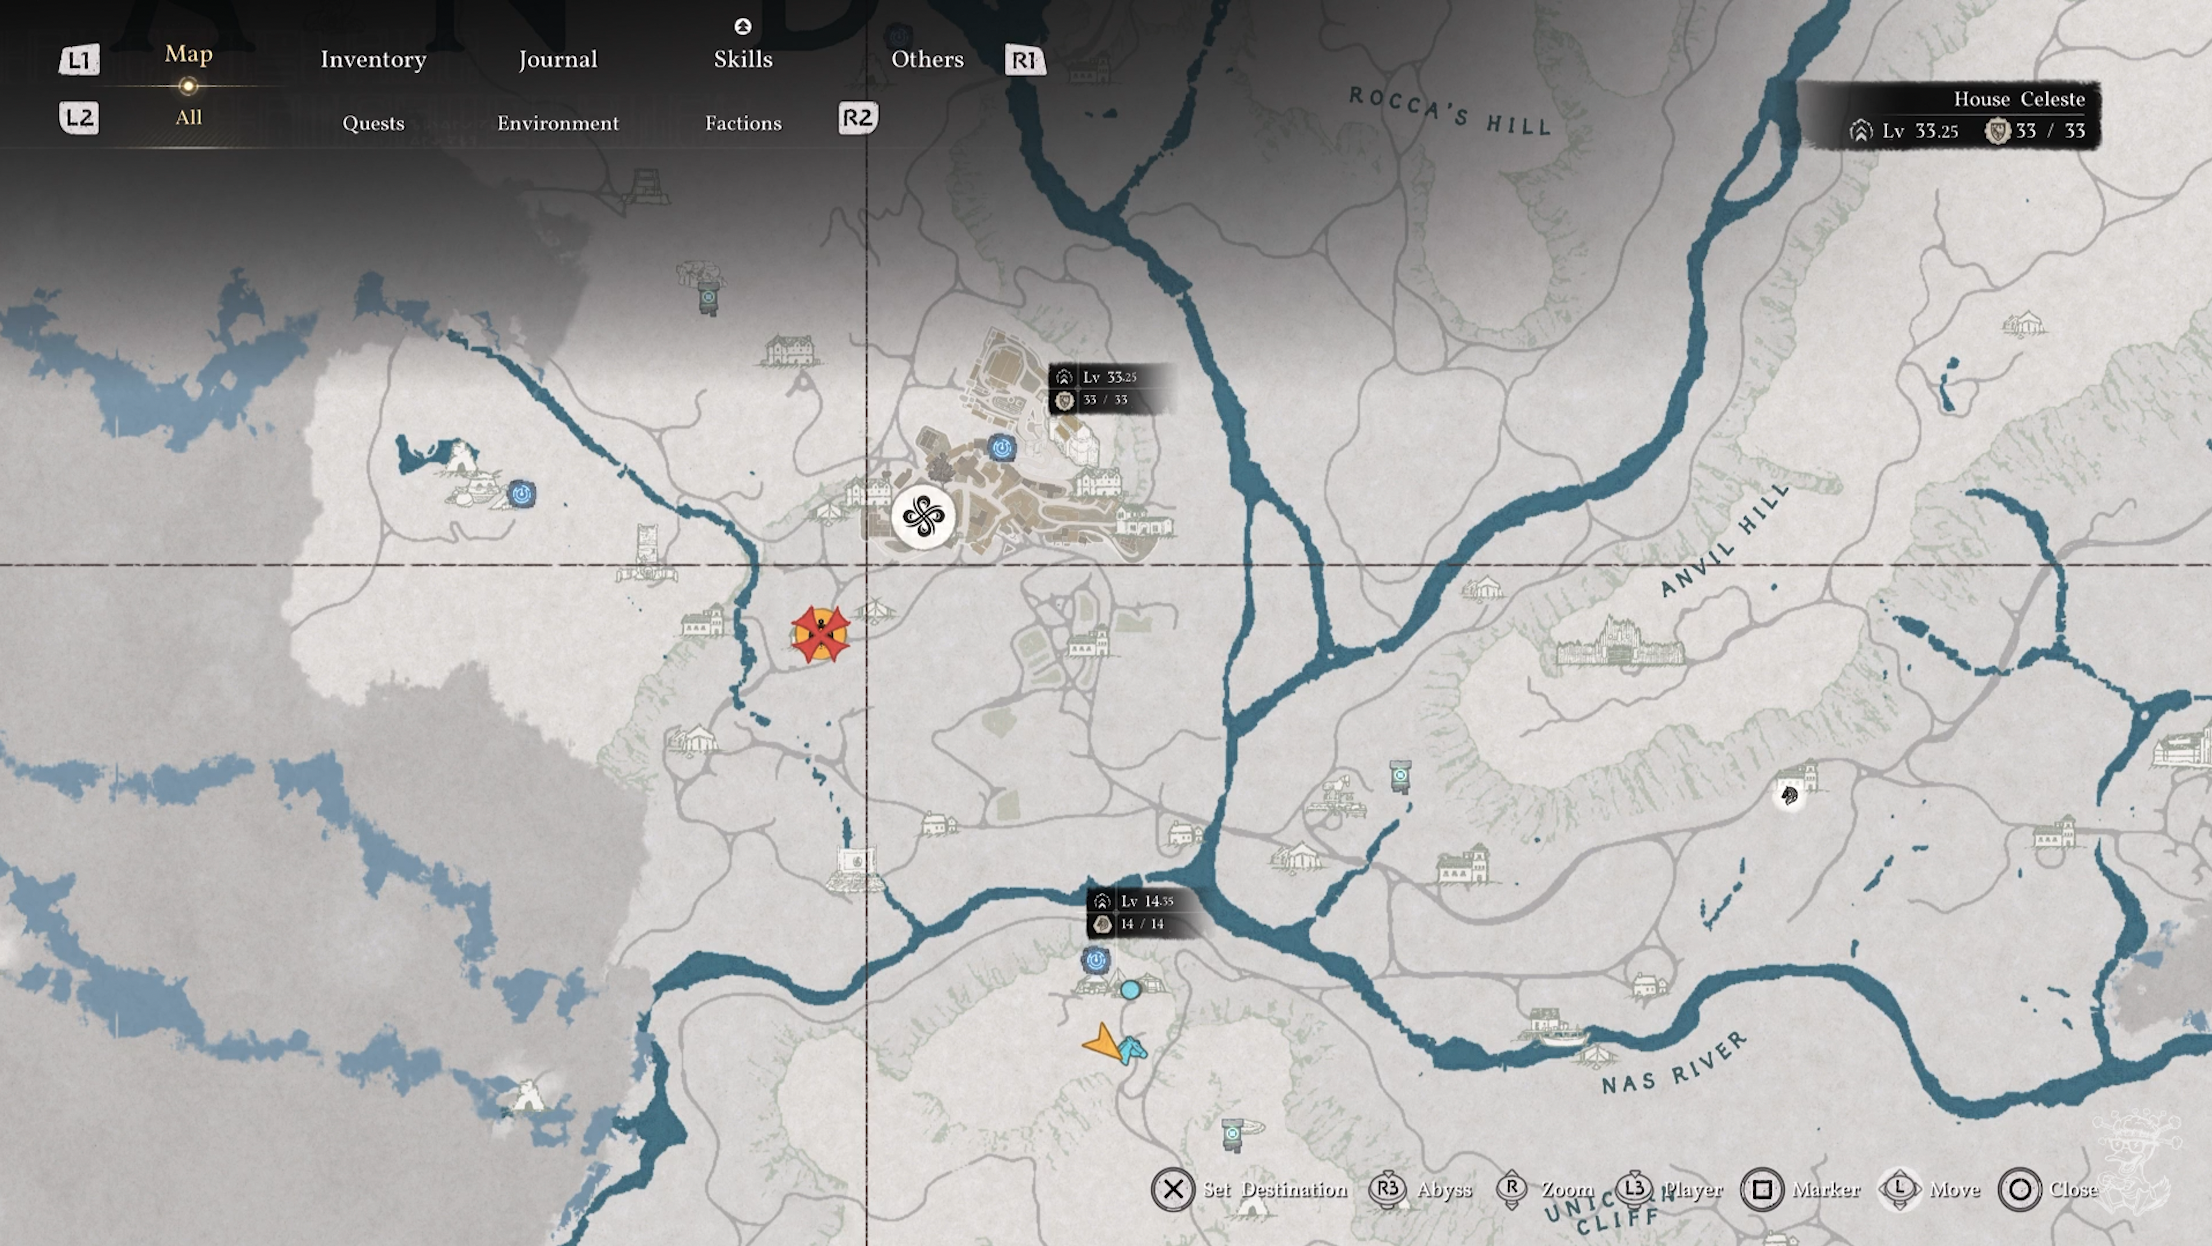
Everyone is at the camp and awoken by an explosion. Kliff ventures out to figure out what the cause of the explosion was. On our way we stop and find an Abyss Nexus right next to the Klinden Workshop we are heading to.
We’re going to the left of the starting city so you can either ride from camp or fast travel to city and run to the west. You’ll find to the right of the Klinden Workshop you are looking for there is an Abyss Nexus. Make sure to stop by this before heading onto the main mission as you will be coming back here in the future.
Klinden Workshop
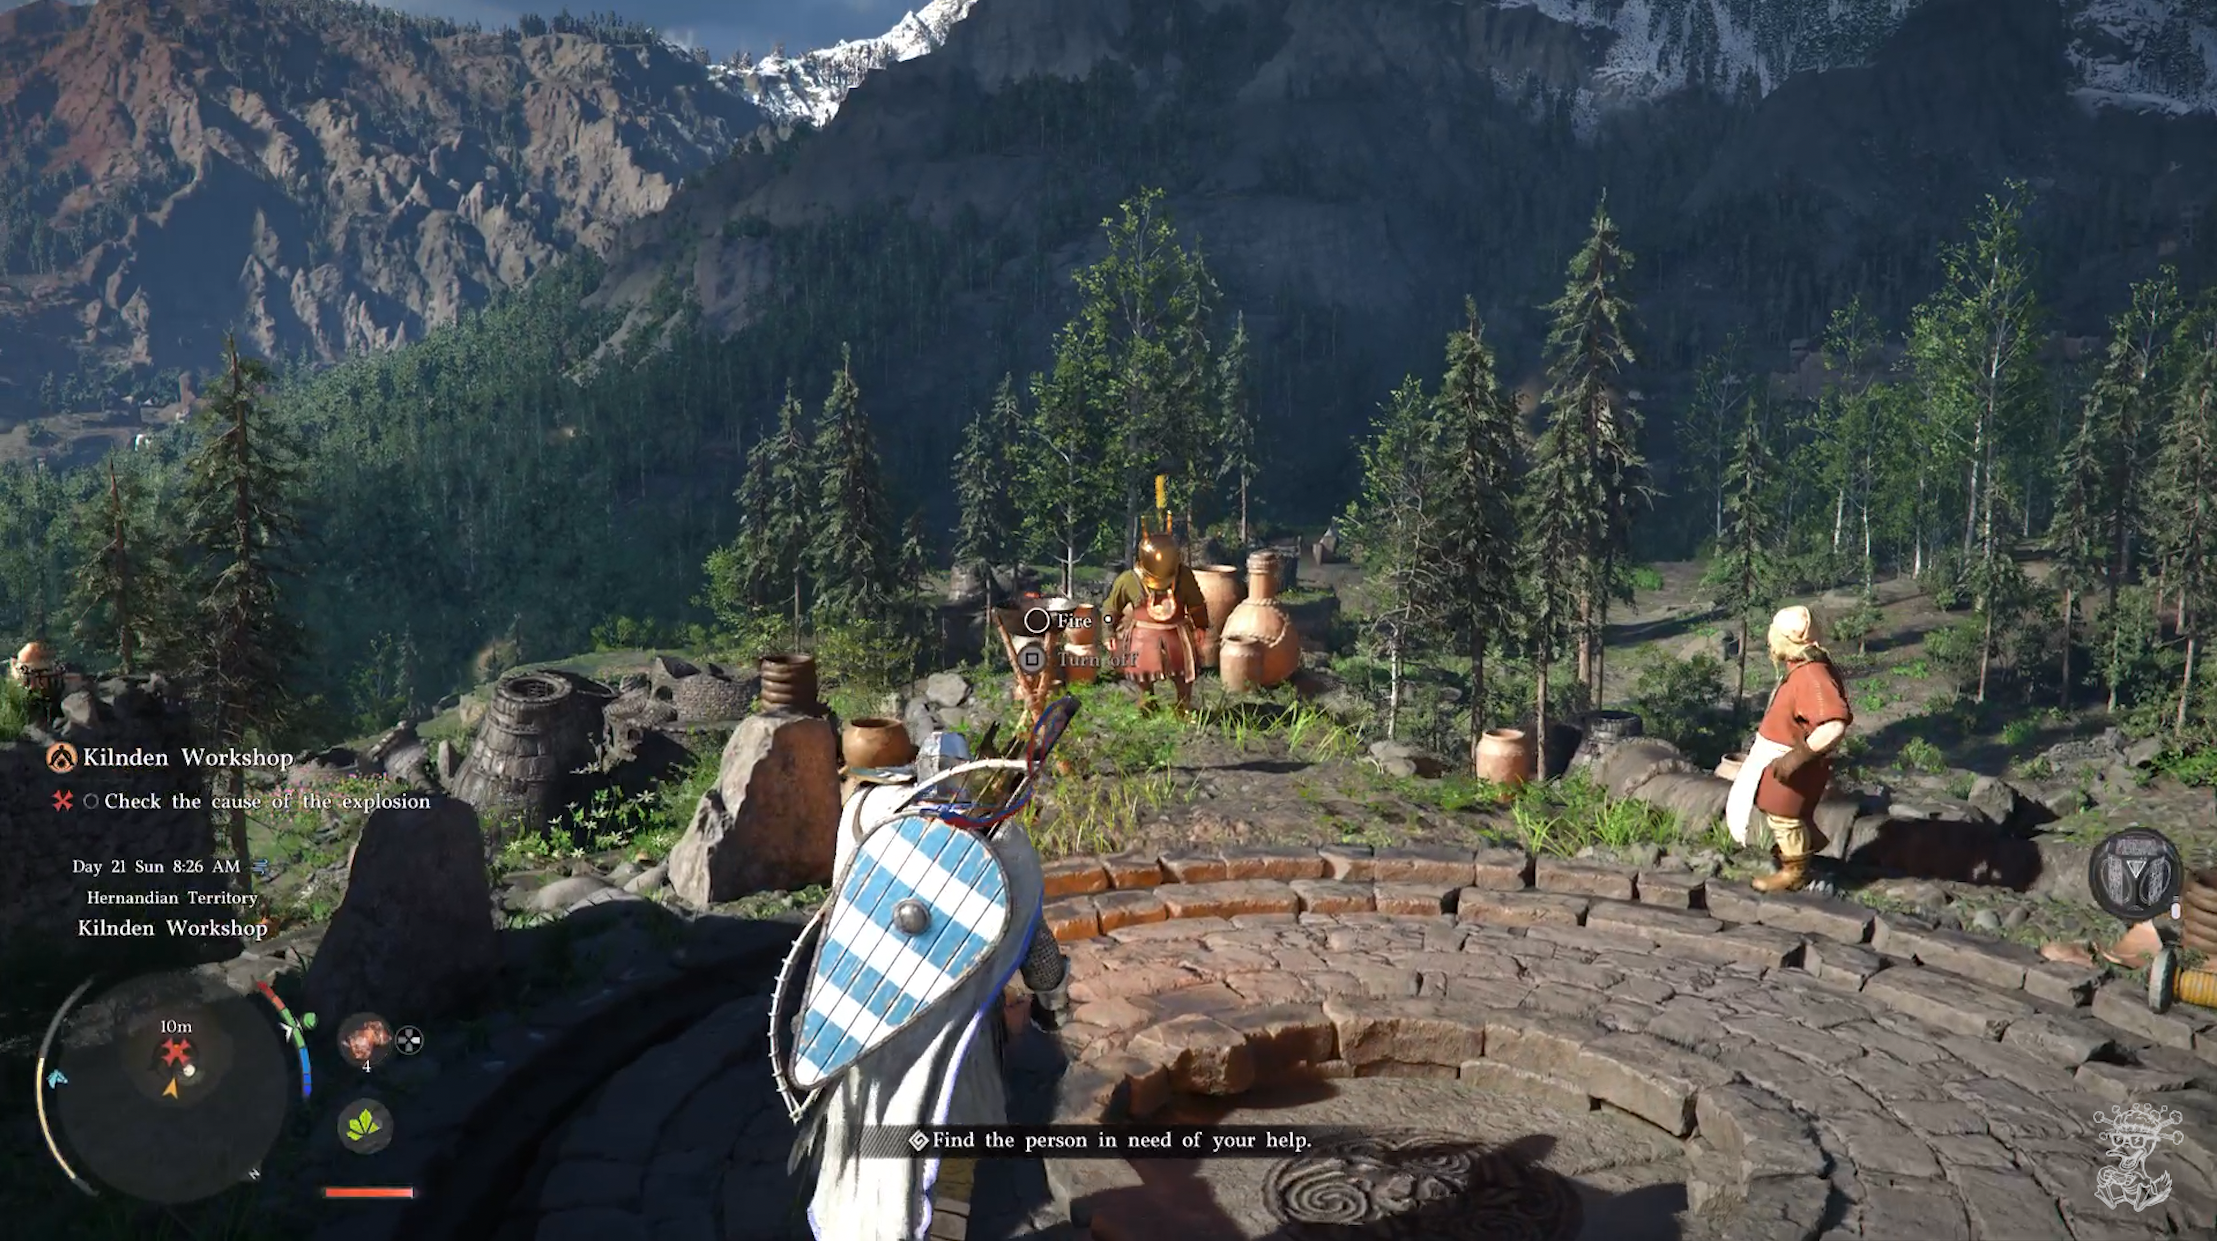
From our new Abyss Nexus, head a little bit more west up on top of the stone cylinder like structure. There you’ll find someone wearing the same gold helmet we have allowing us to watch memories.
Walk up to him and a cutscene will begin. The man eventually explains he needs help fueling up his machine which is where we come in.
Kiln Repair at the Kilnden Workshop
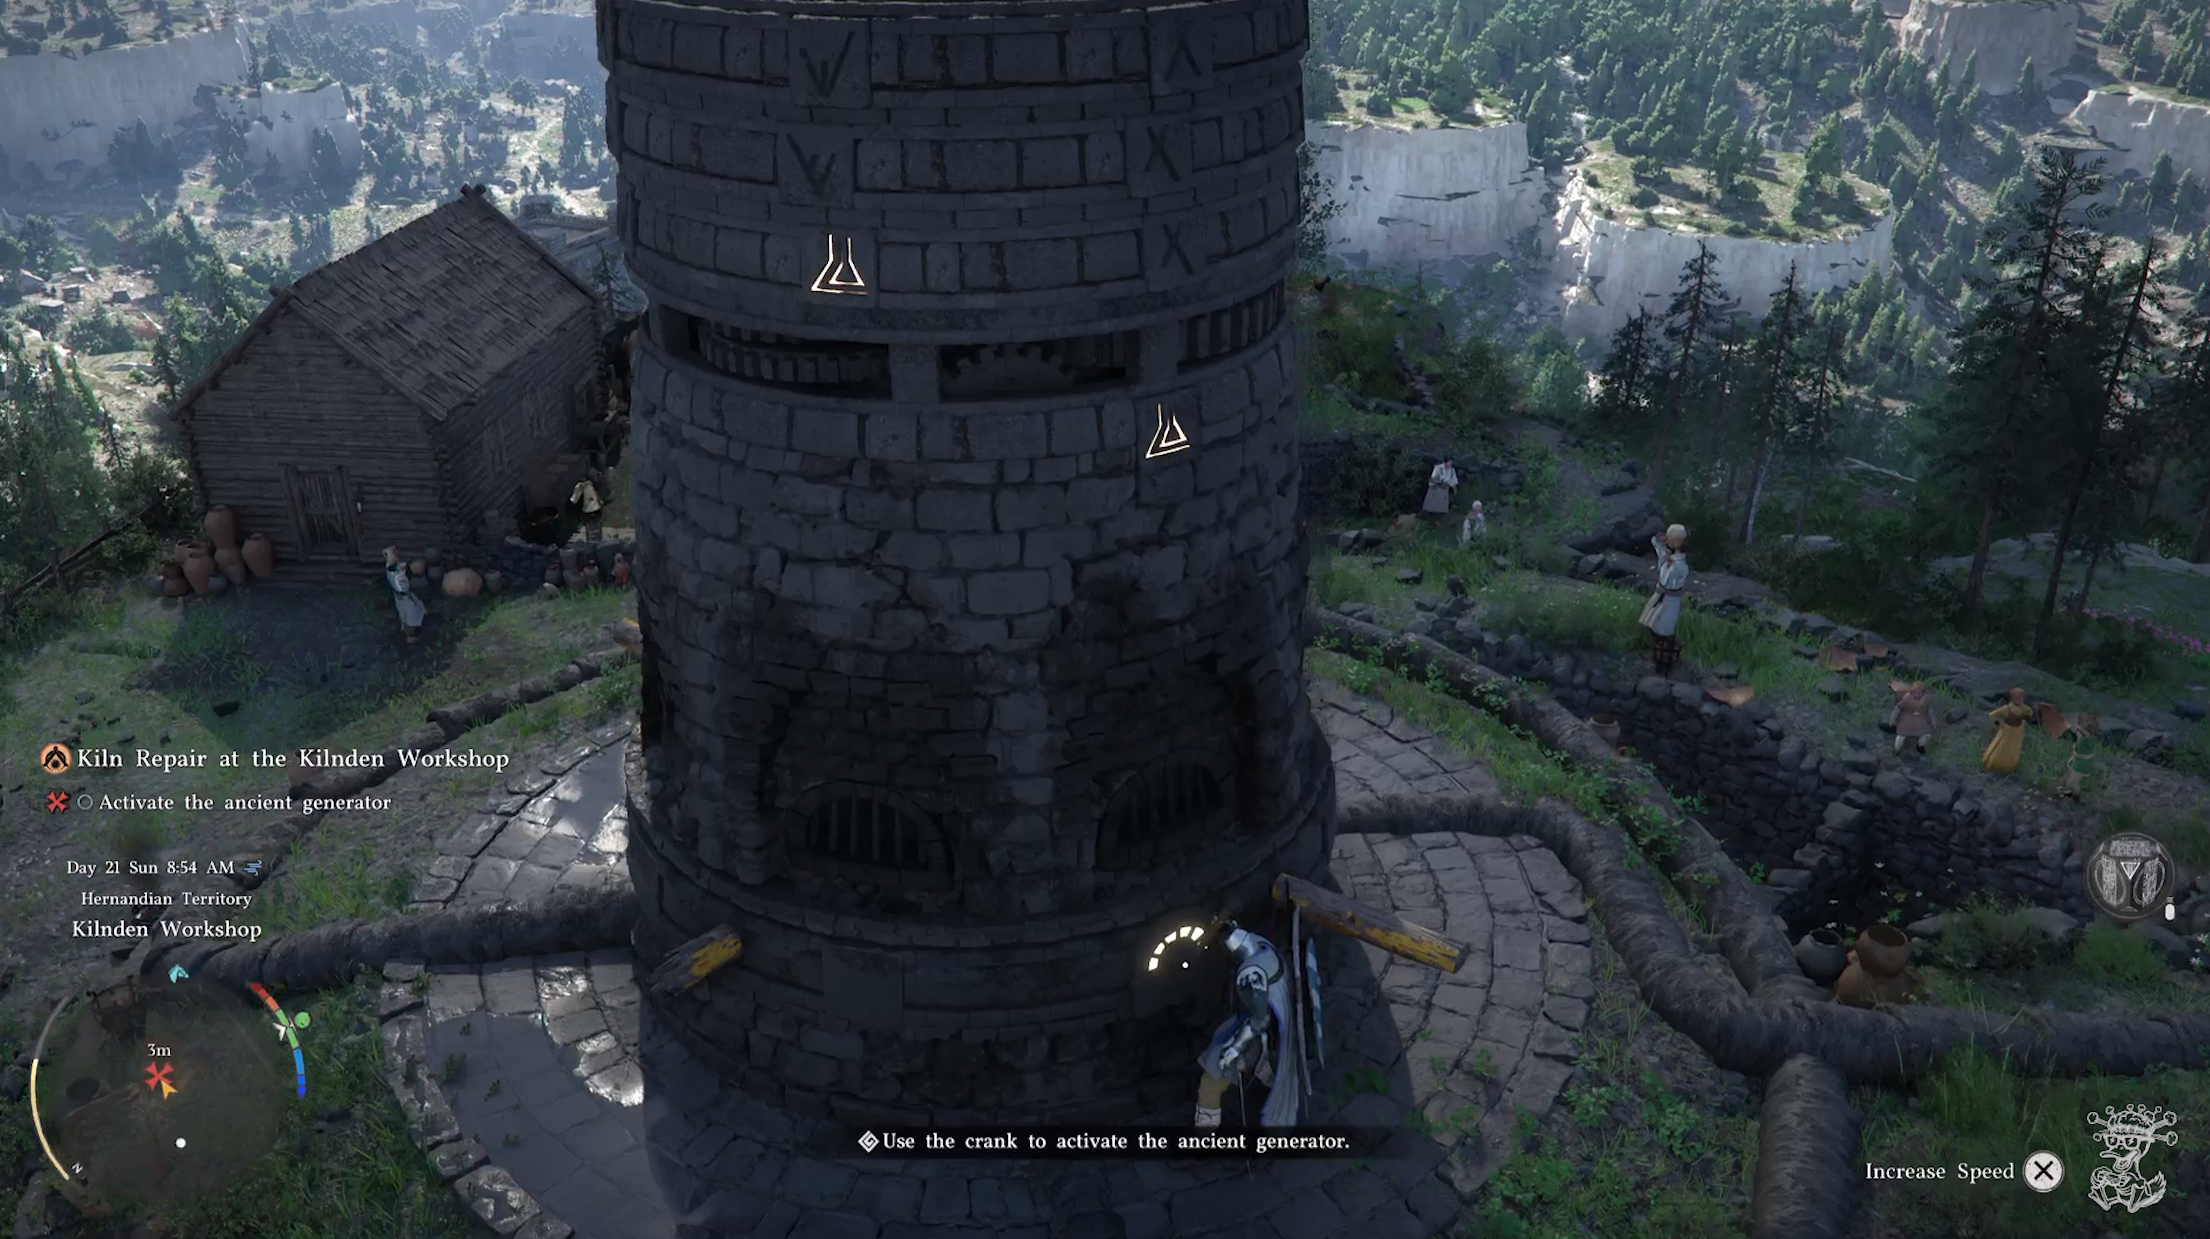
We now need repair the giant kiln. Turn around after the cutscene and walk up to the big tower. You’ll notice a switch with a crank and a couple wood poles sticking out with the one on your left broken. Start pushing the pole on your right and you’ll notice the structure start moving. If you look up you’ll see the structure is split into multiple sections with one glowing beaker like icon per section. The switch activates the glowing icons. We’re going to need to line up all the glowing ones with the one at the bottom that doesn’t move as you spin the tower.
First, turn the crank on the switch all the way to the right. this will show you a glowing icon on the bottom of the moving pieces. Now push the pole on your right to turn the sections until the two glowing ones match. Once they do stop pushing and go back to the switch.
Now slowly pull the crank on the switch to the left and you’ll see a glowing icon on another section of the puzzle. Now use the pole to spin them again and only that section will move. Now you can match it to the other 2 you have. Rinse and repeat for the 3rd section and yo'u’ve solved the puzzle.
Kiln Repair at the Kilnden Workshop
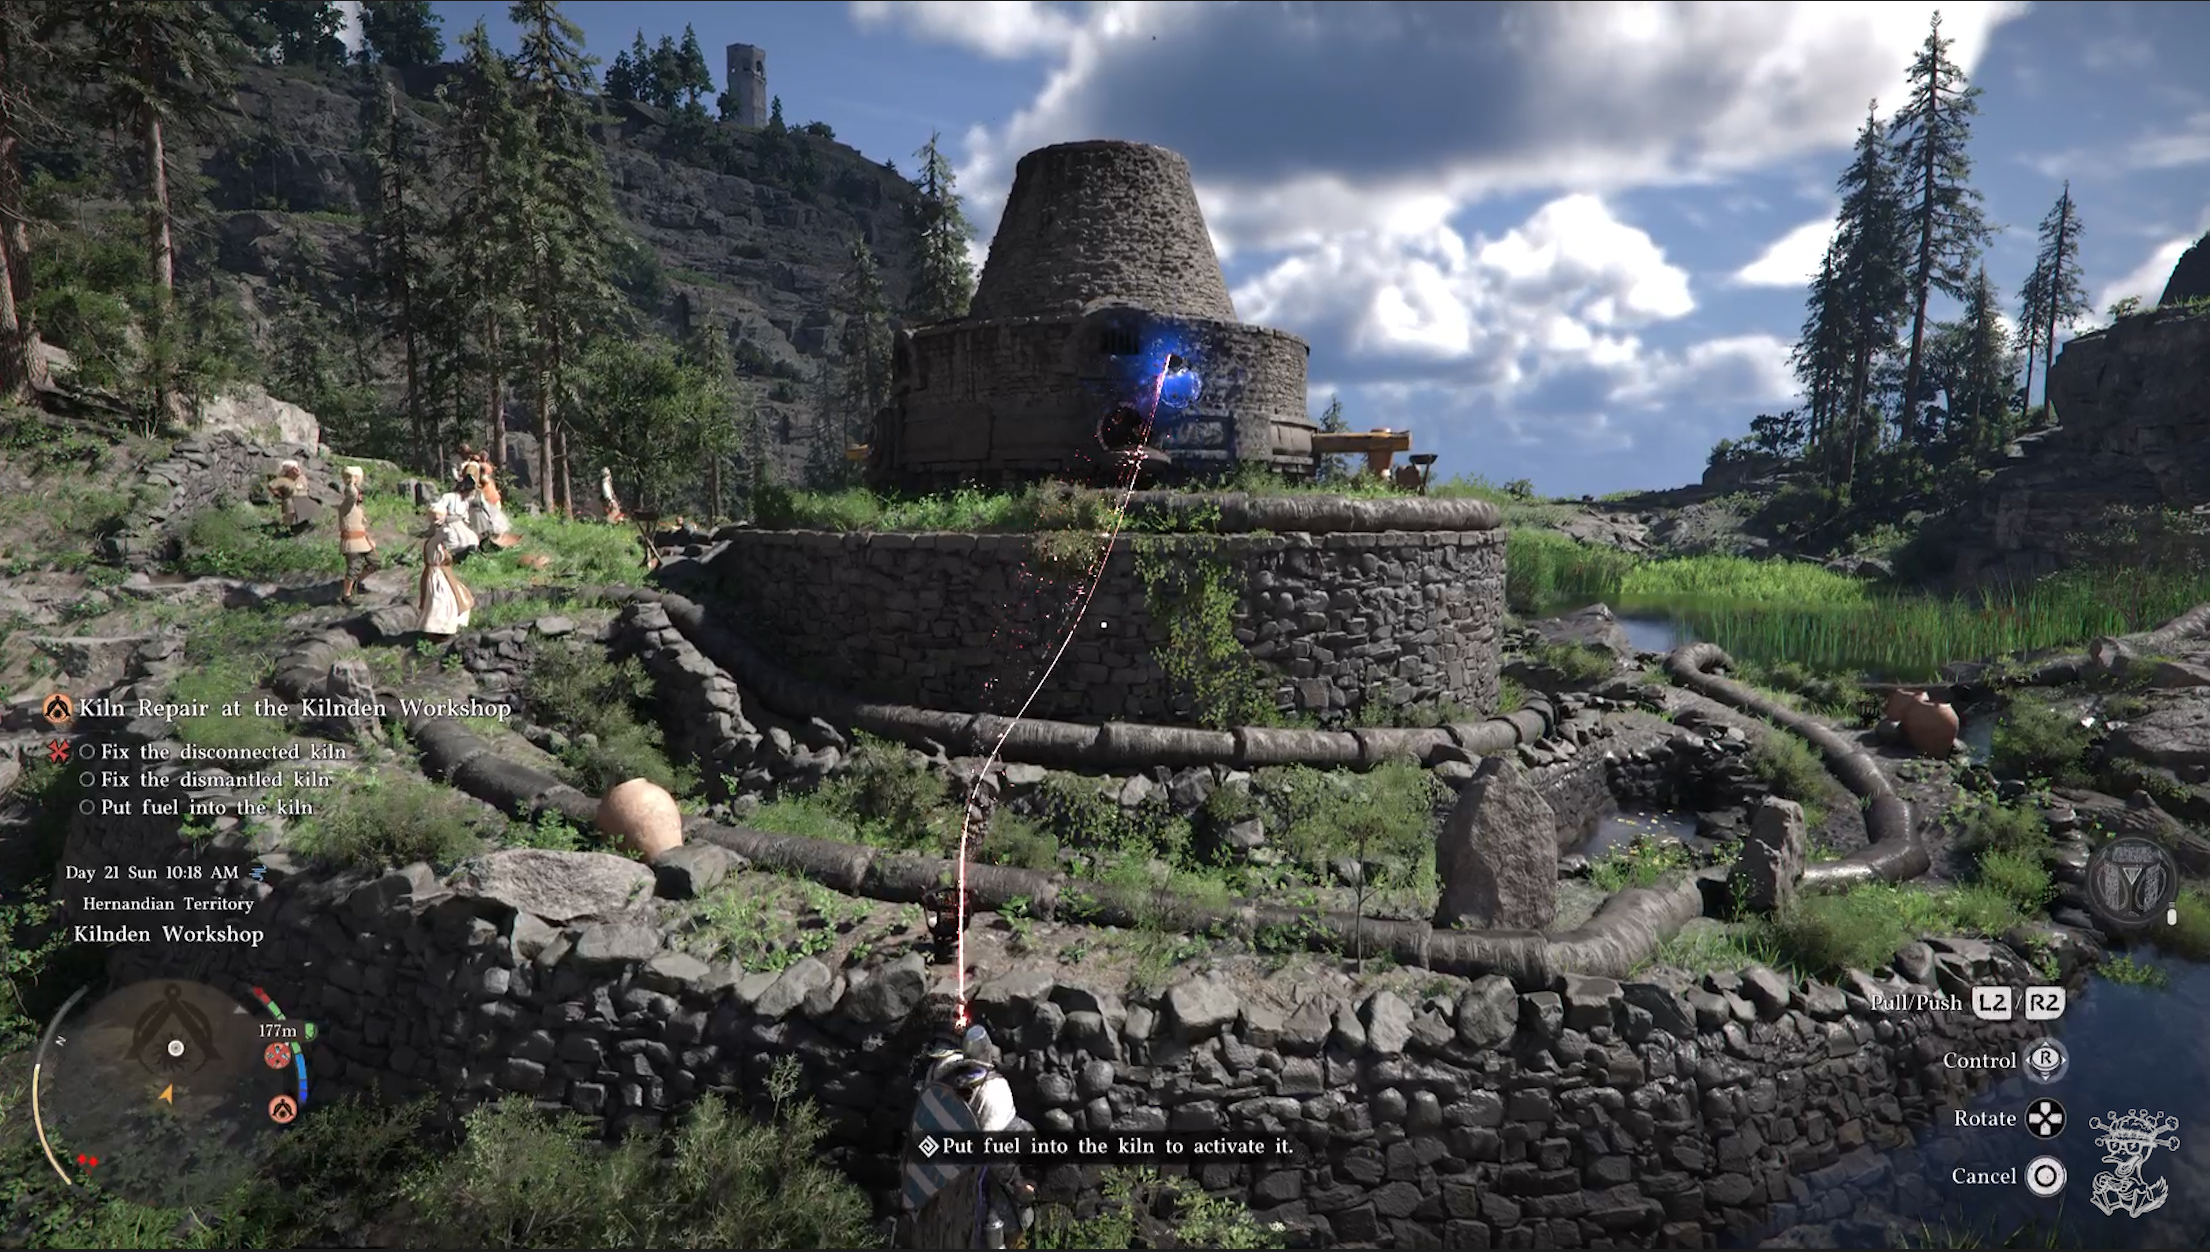
Did you think fixing the generator was the last of it? Ya right! These NPC’s love doing one thing and that’s making you do their work! Now that you’ve fixed the generator you have 3 more things to fix. You can do them in any order, if you’re following along with my video guide, we will do them in this order. Turn around from the tower and if you use blinding light while looking off the edge towards your right and you’ll see a glowing blue light. Fly over to it.
You need to put fuel in the kiln to activate it. To do that you need to find 3 glowing blue orbs around the kiln and put them into the holes on the kiln using Axiom Force. Once they are all in, you need to push the crank sticking out of it until it powers up. In the video I leave the first one thinking I needed to do something else, not realizing I should just push the crank. So if you’re following along, just push it now so you don’t have to fly back.
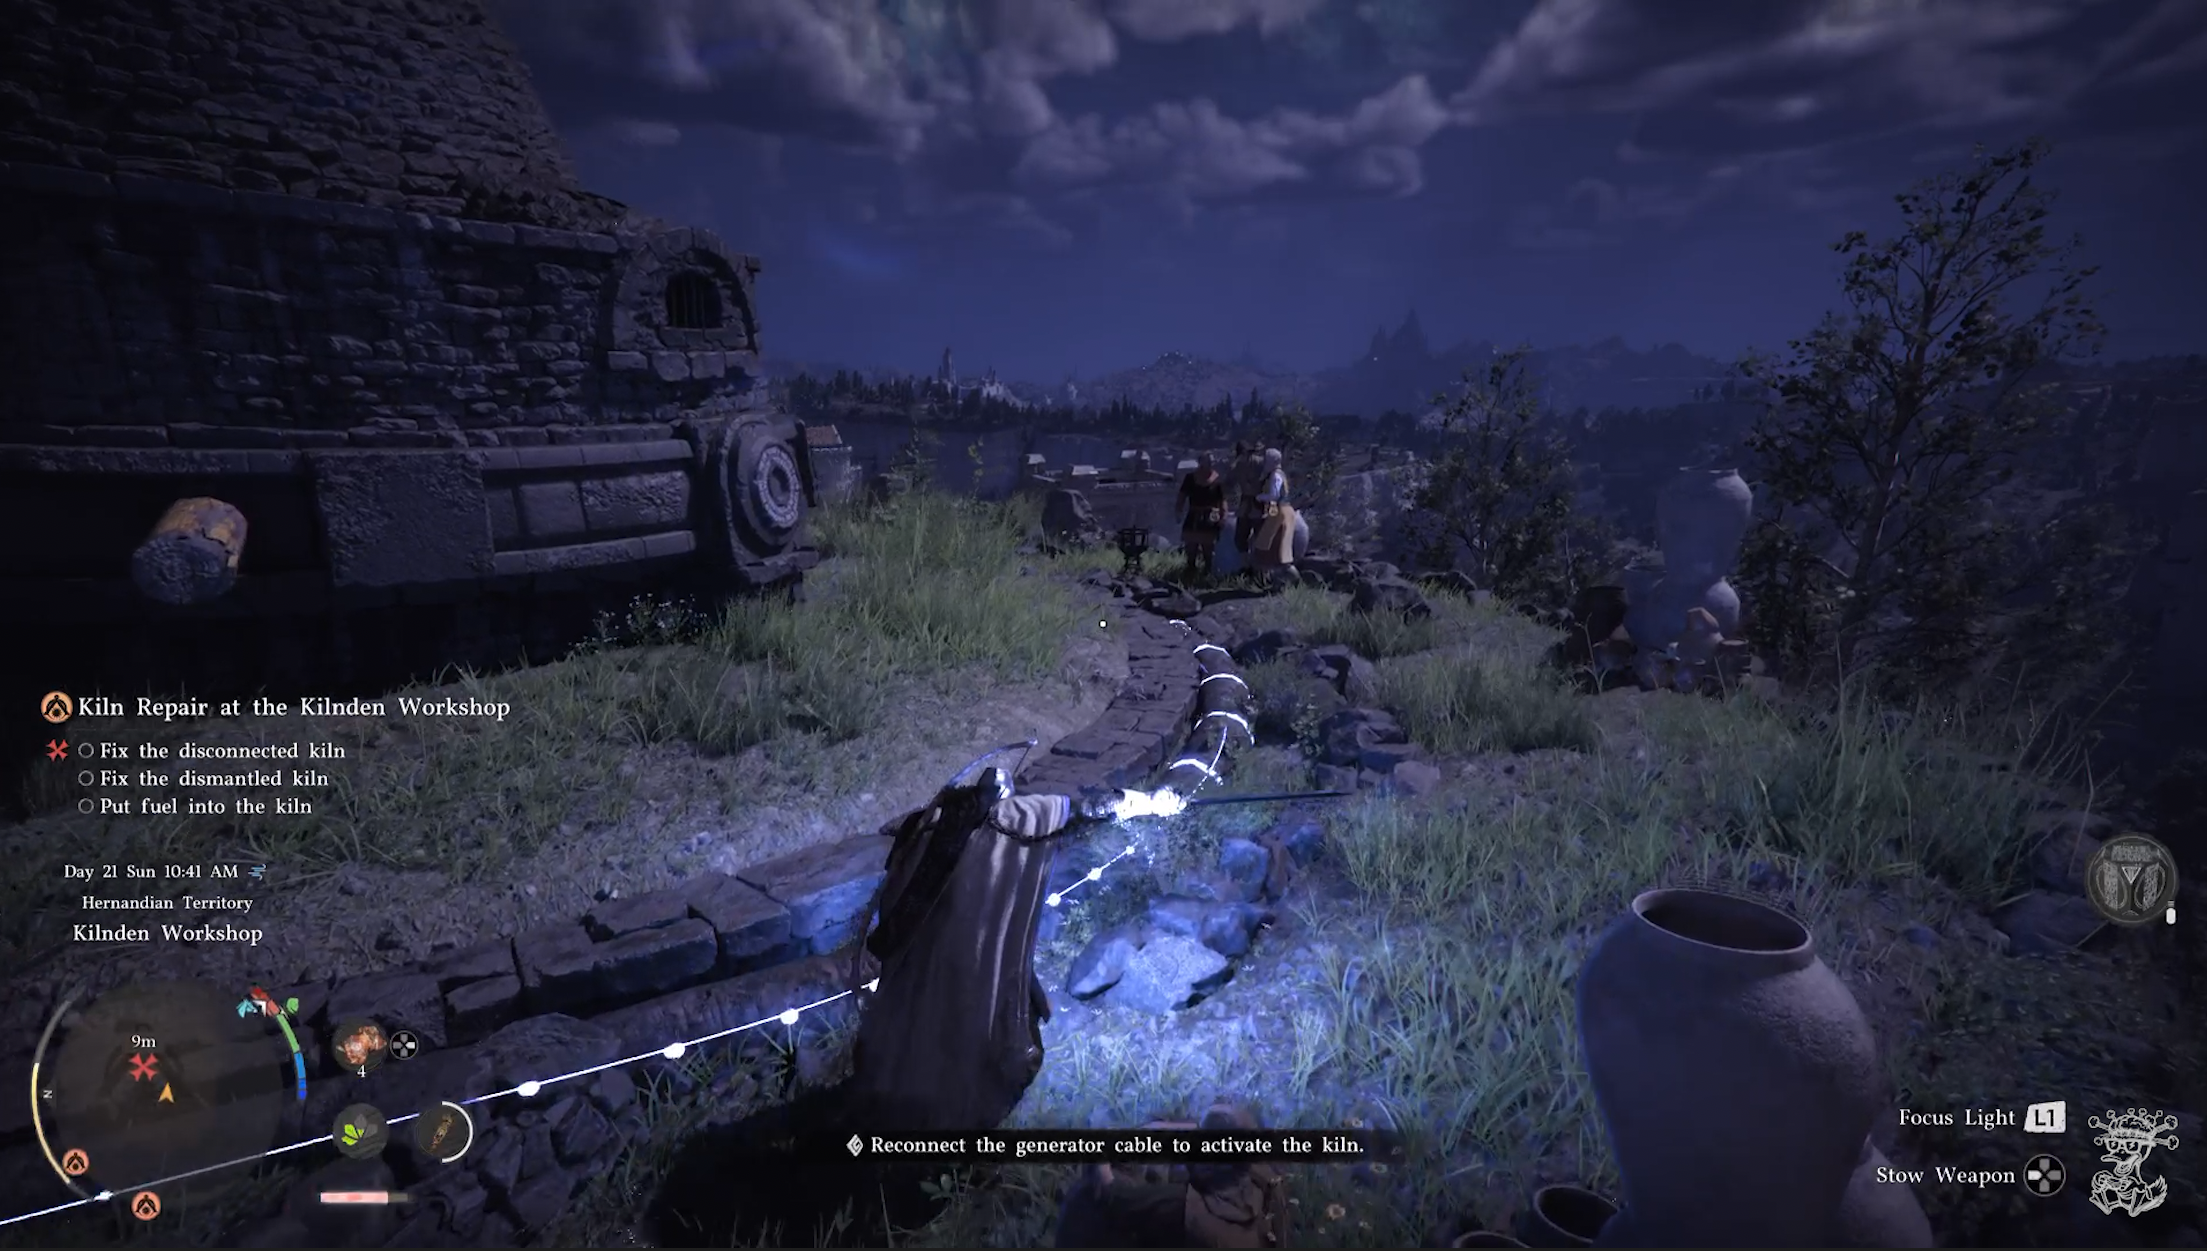
Go back towards the initial puzzle and go past it to the right. If you mark it on your map its easy to find. Once here use blinding light and follow the glowing blue power line on the floor leading to the kiln. When you get to where it meets the kiln you’ll find its broken and disconnected. Walk up to it, hold L1 and look for the prompt to hold square and fix the connection. Then push the crank to activate the kiln.
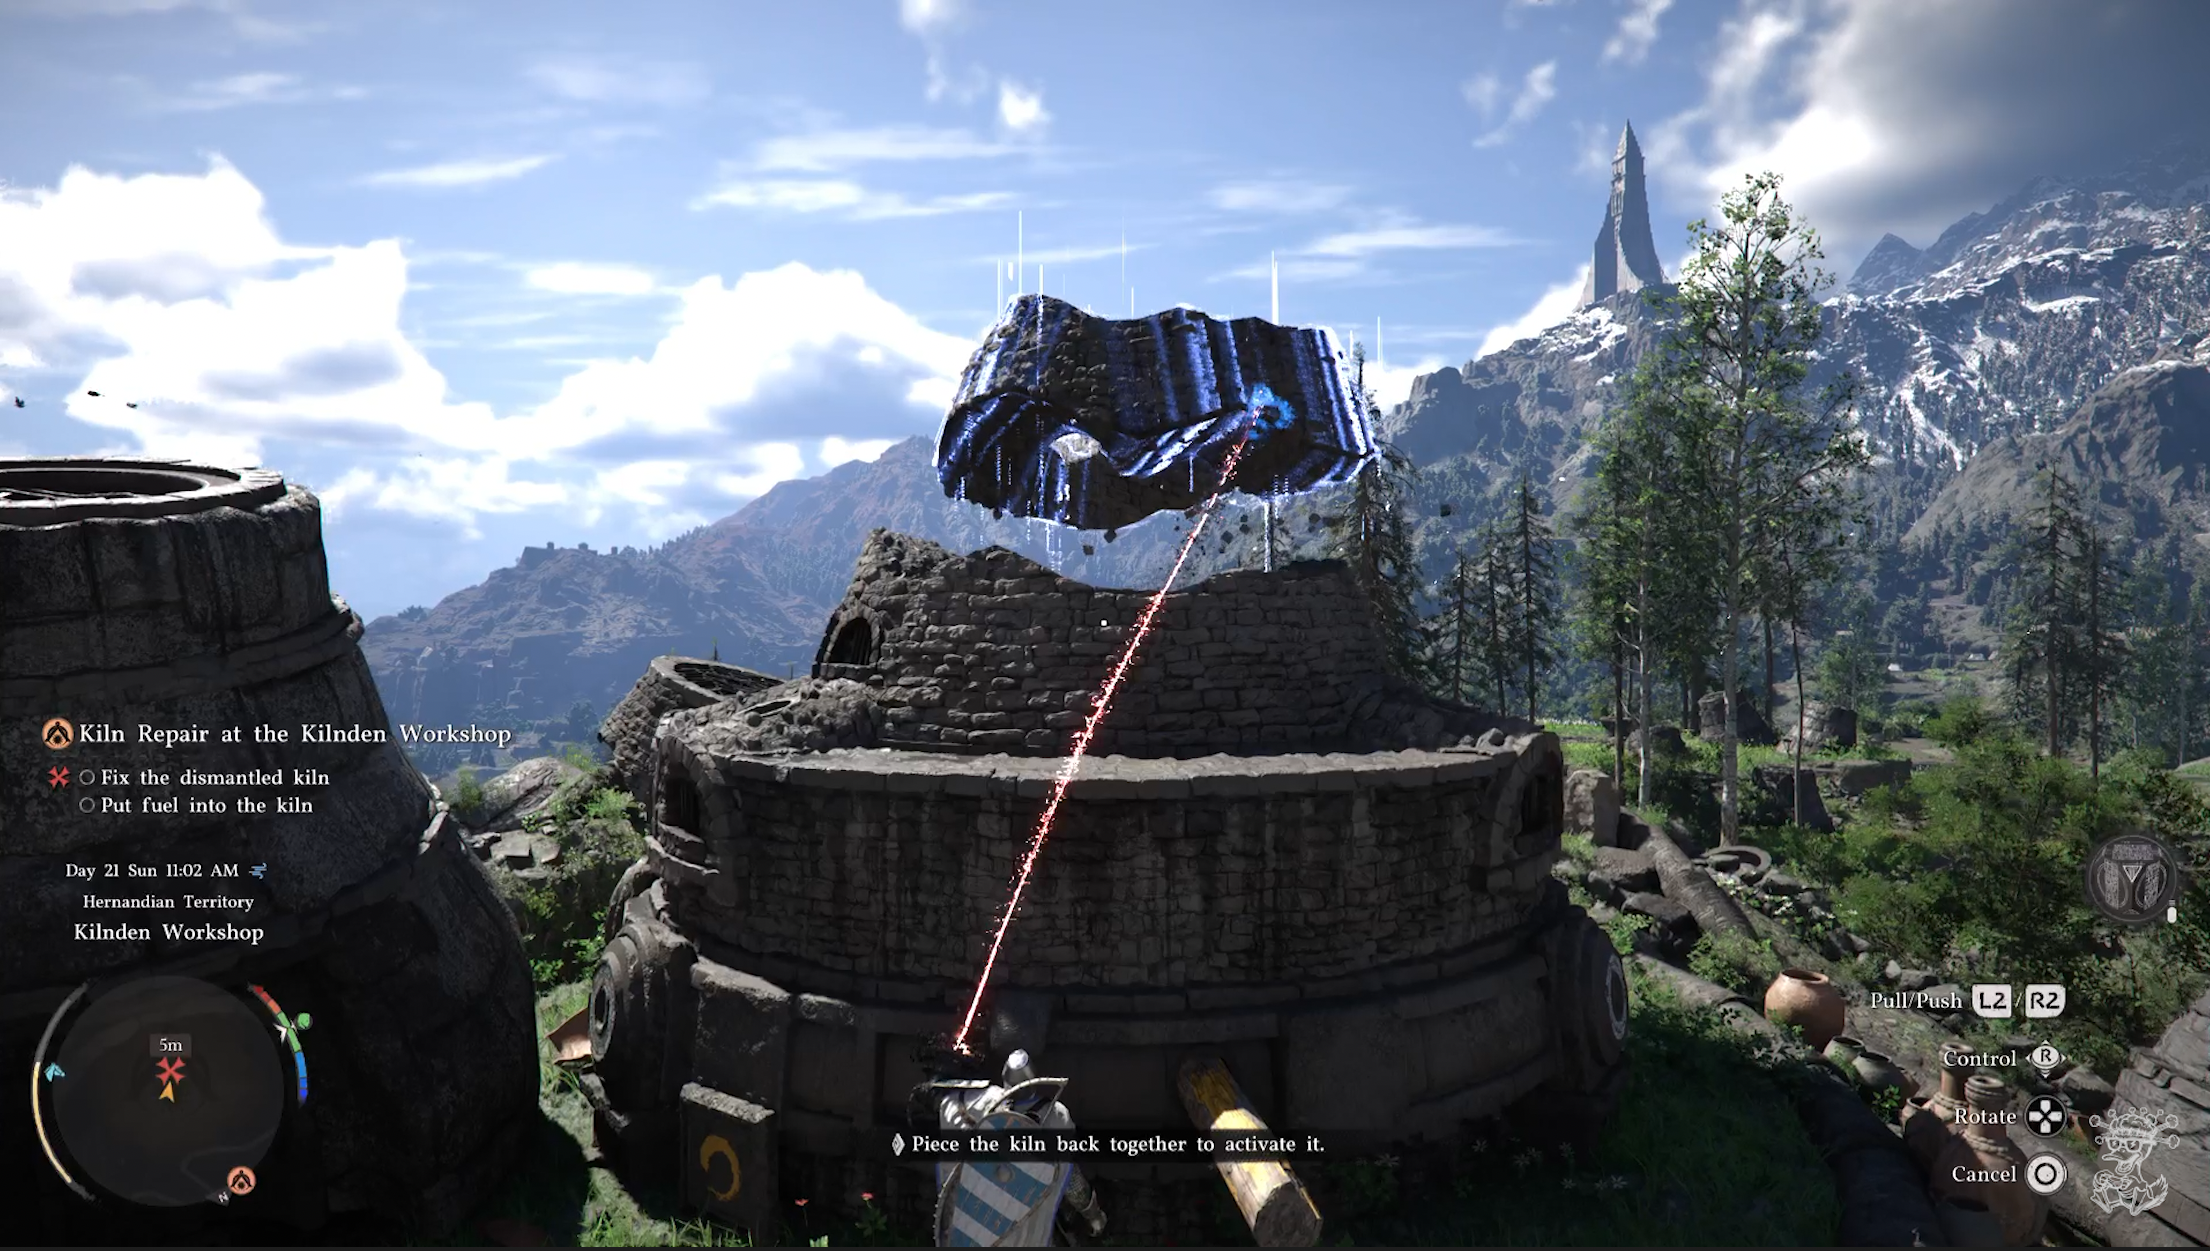
Now the X will be marked on your map to fix the dismantled kiln. Run over there and you will find a kiln broken into pieces. You need to use Axiom Force to lift and spin the pieces and stack them together correctly. Luckily, there are only 2 pieces, one of them being the top with a grate on top, so its pretty easy to figure out.
From the front of it, look to your right and grab the first piece with Axiom Force and stack it on top of the base. You’ll need to spin it until it fits correctly, then pull it down as close as you can and let go of Axiom Force. Then jump on top of it, jump again and force push down to secure it into place. Once it’s secure, do the same thing with the other piece thats right behind the base.
Now that the pieces are secure and you have your kiln. Push the lever to the side and activate the kiln. Once all 3 kilns are on, a small cutscene will happen and you will appear back near the first puzzle. Walk up and Speak with Grimnir.
After a small cutscene and you’re in control again, it will ask you to wait. To wait, just push pause or hold pause and move along the side menu to the bottom and select wait. Once you’re in control again, just walk up and Speak with Grimnir.
You guessed it, another cutscene. He basically just tells you to go get the pot he made you down below. He does also give you a Gold Bar which is pretty nice.
The Mysterious Pot
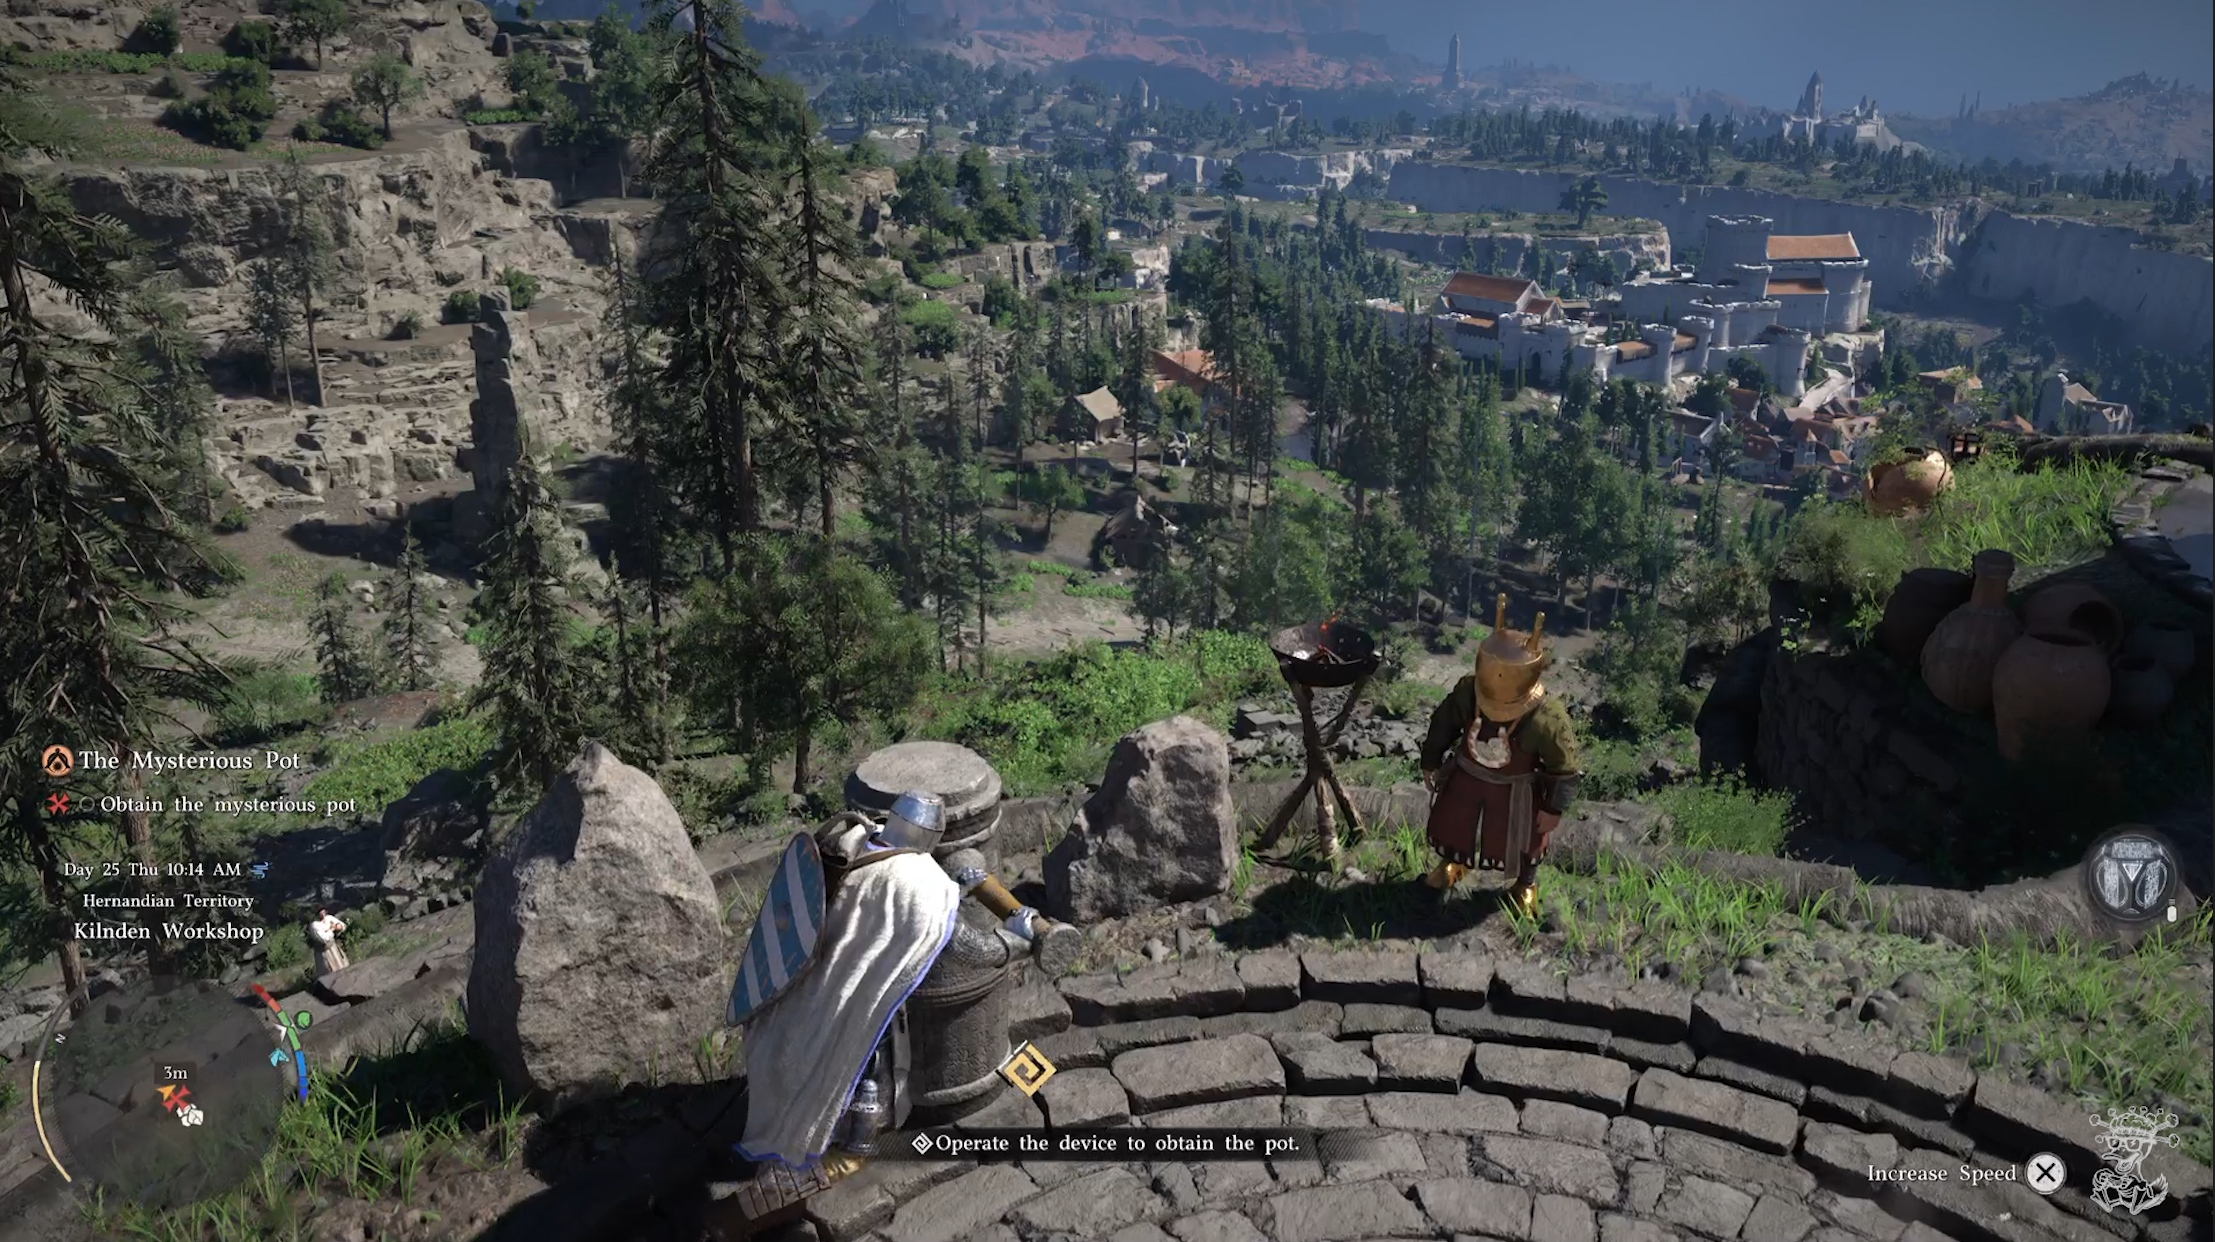
Head over to the lever near Grimnir on the circle platform and start pushing it to Operate the device and obtain the pot. Keep pushing it until the circle in the middle opens and the Kuku Pot comes flying out. Go pick it up and learn how to use it from Grimnir.
Now Grimnir actually isnt going to teach you how to use it. I guess he just makes the stuff. So head over to the X on your map nearby and find Togrum.
The Pot’s Use
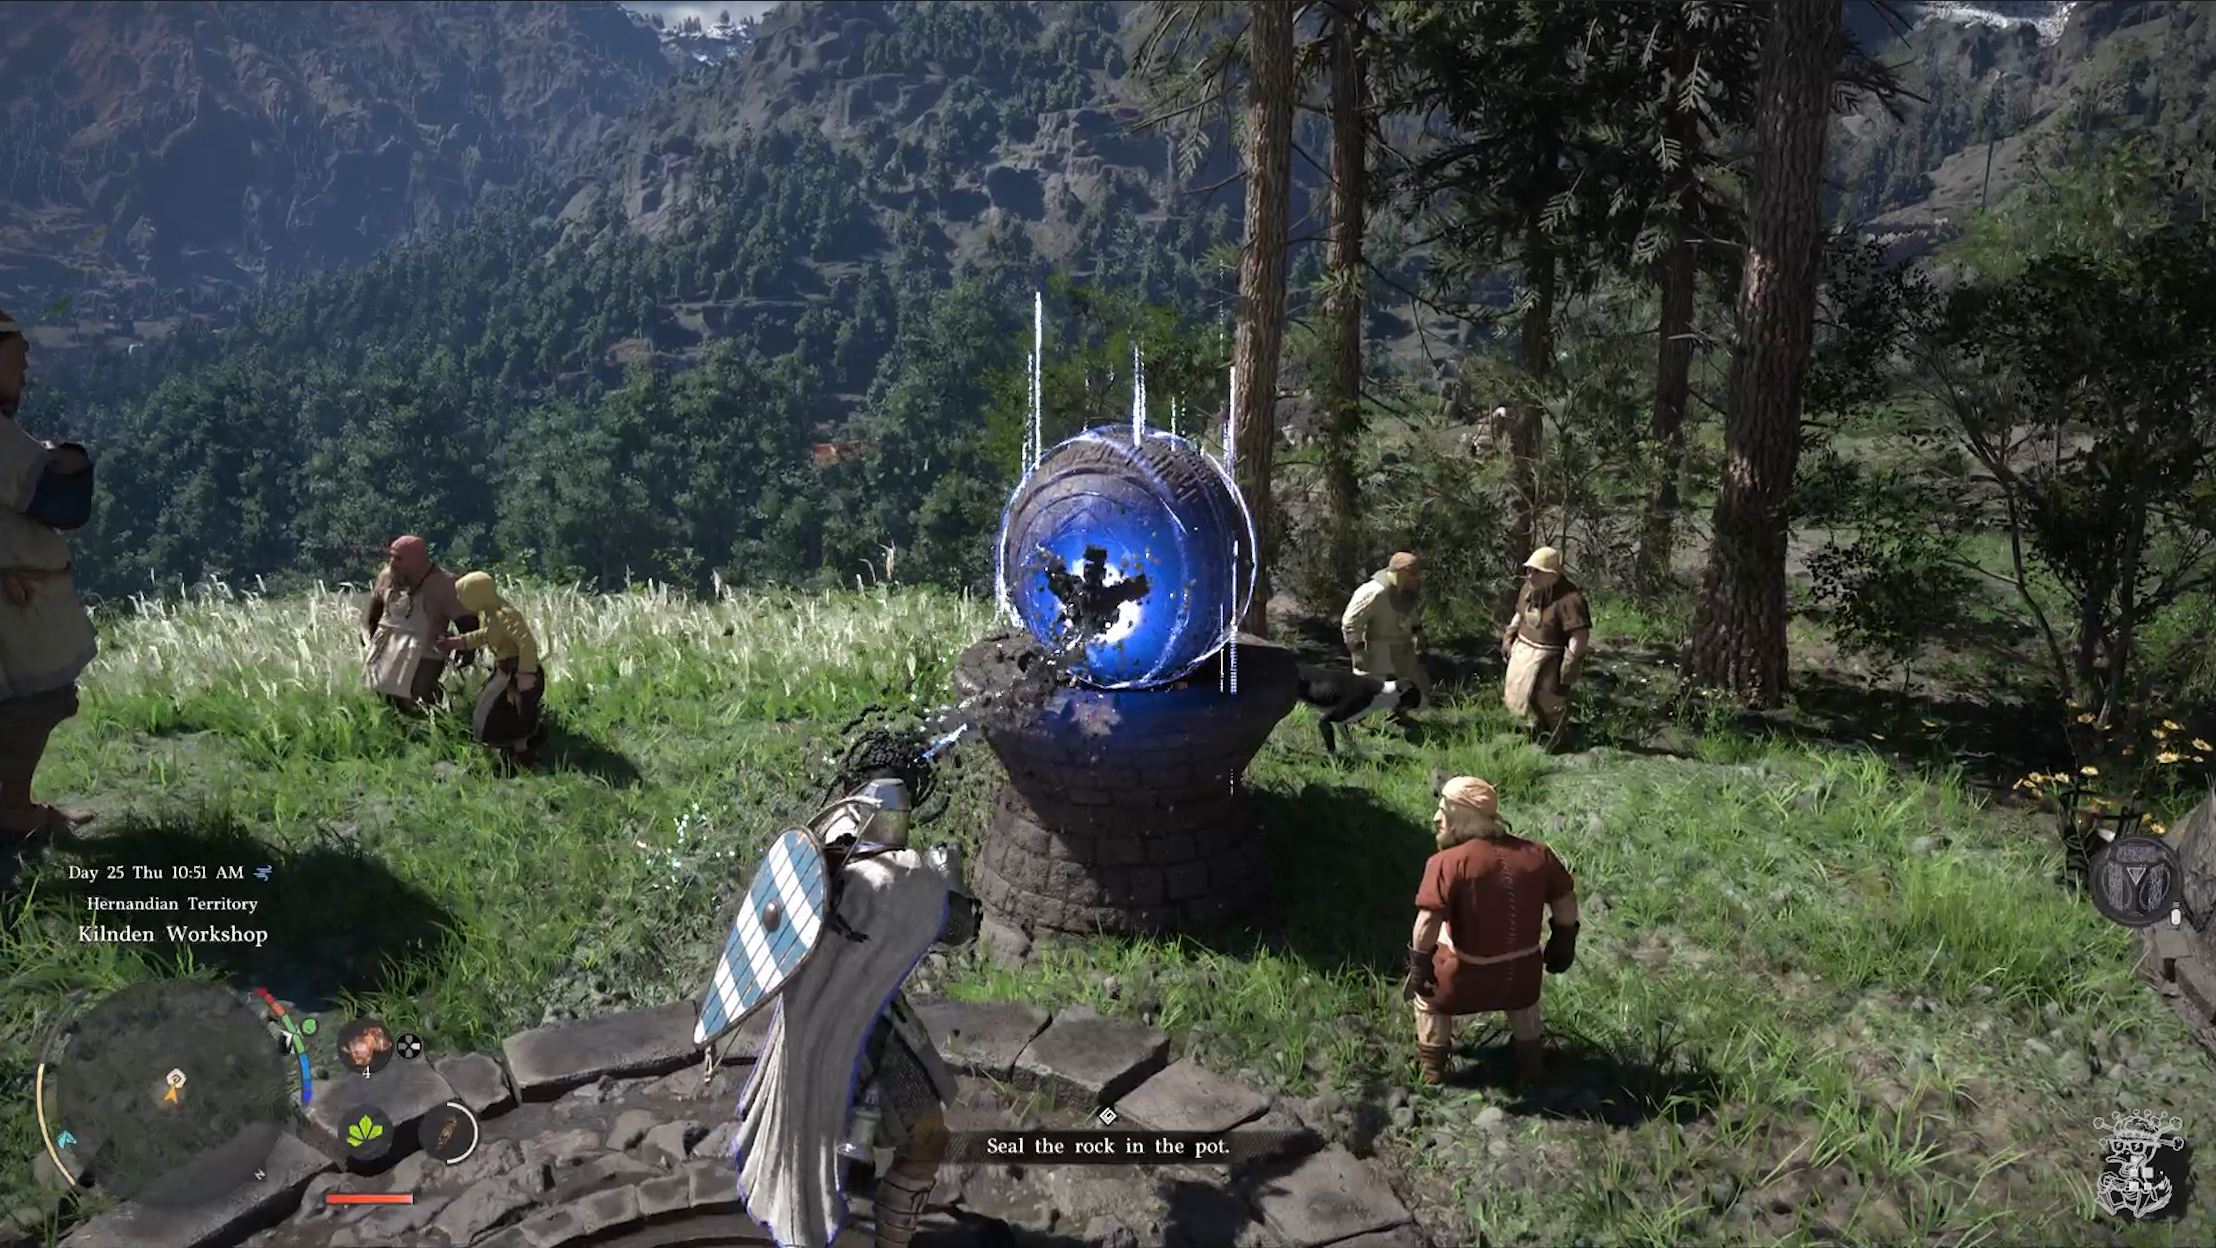
After speaking with Togrum he’ll walk you through using the pot.
Get close to the rock next to him and it will tell you to push triangle. You will use Axiom Force to grab it and then seal it into your new Kuku Pot. You will find the Kuku Pot in your inventory and when you select it you will see things you’ve sealed in it.
You won’t really need this right now, but you will use this as you explore the world. You will find Abyss types items around the world that you will want to seal and then discard at the right time to use for puzzles.
Daily Life

Now that you have your new handy Kuku Pot, you just need to return to Howling Hill. Once you return, you will speak to Andrew and begin a cutscene. Andrew will tell you he’s worried about Yan. Then Duane runs in tell you that Yan is in trouble. Once you’re back in control, call your horse and follow Duane to help Yan.
As you follow Duane will explain that Yan got drunk and got into someones merch and it was the wrong person to mess with. They locked him up and you gotta get him out. He messed up at the fighting arena and Yan refuses to pay anything.
You’re going to need to fight and become the champion of the arena to free Yan.
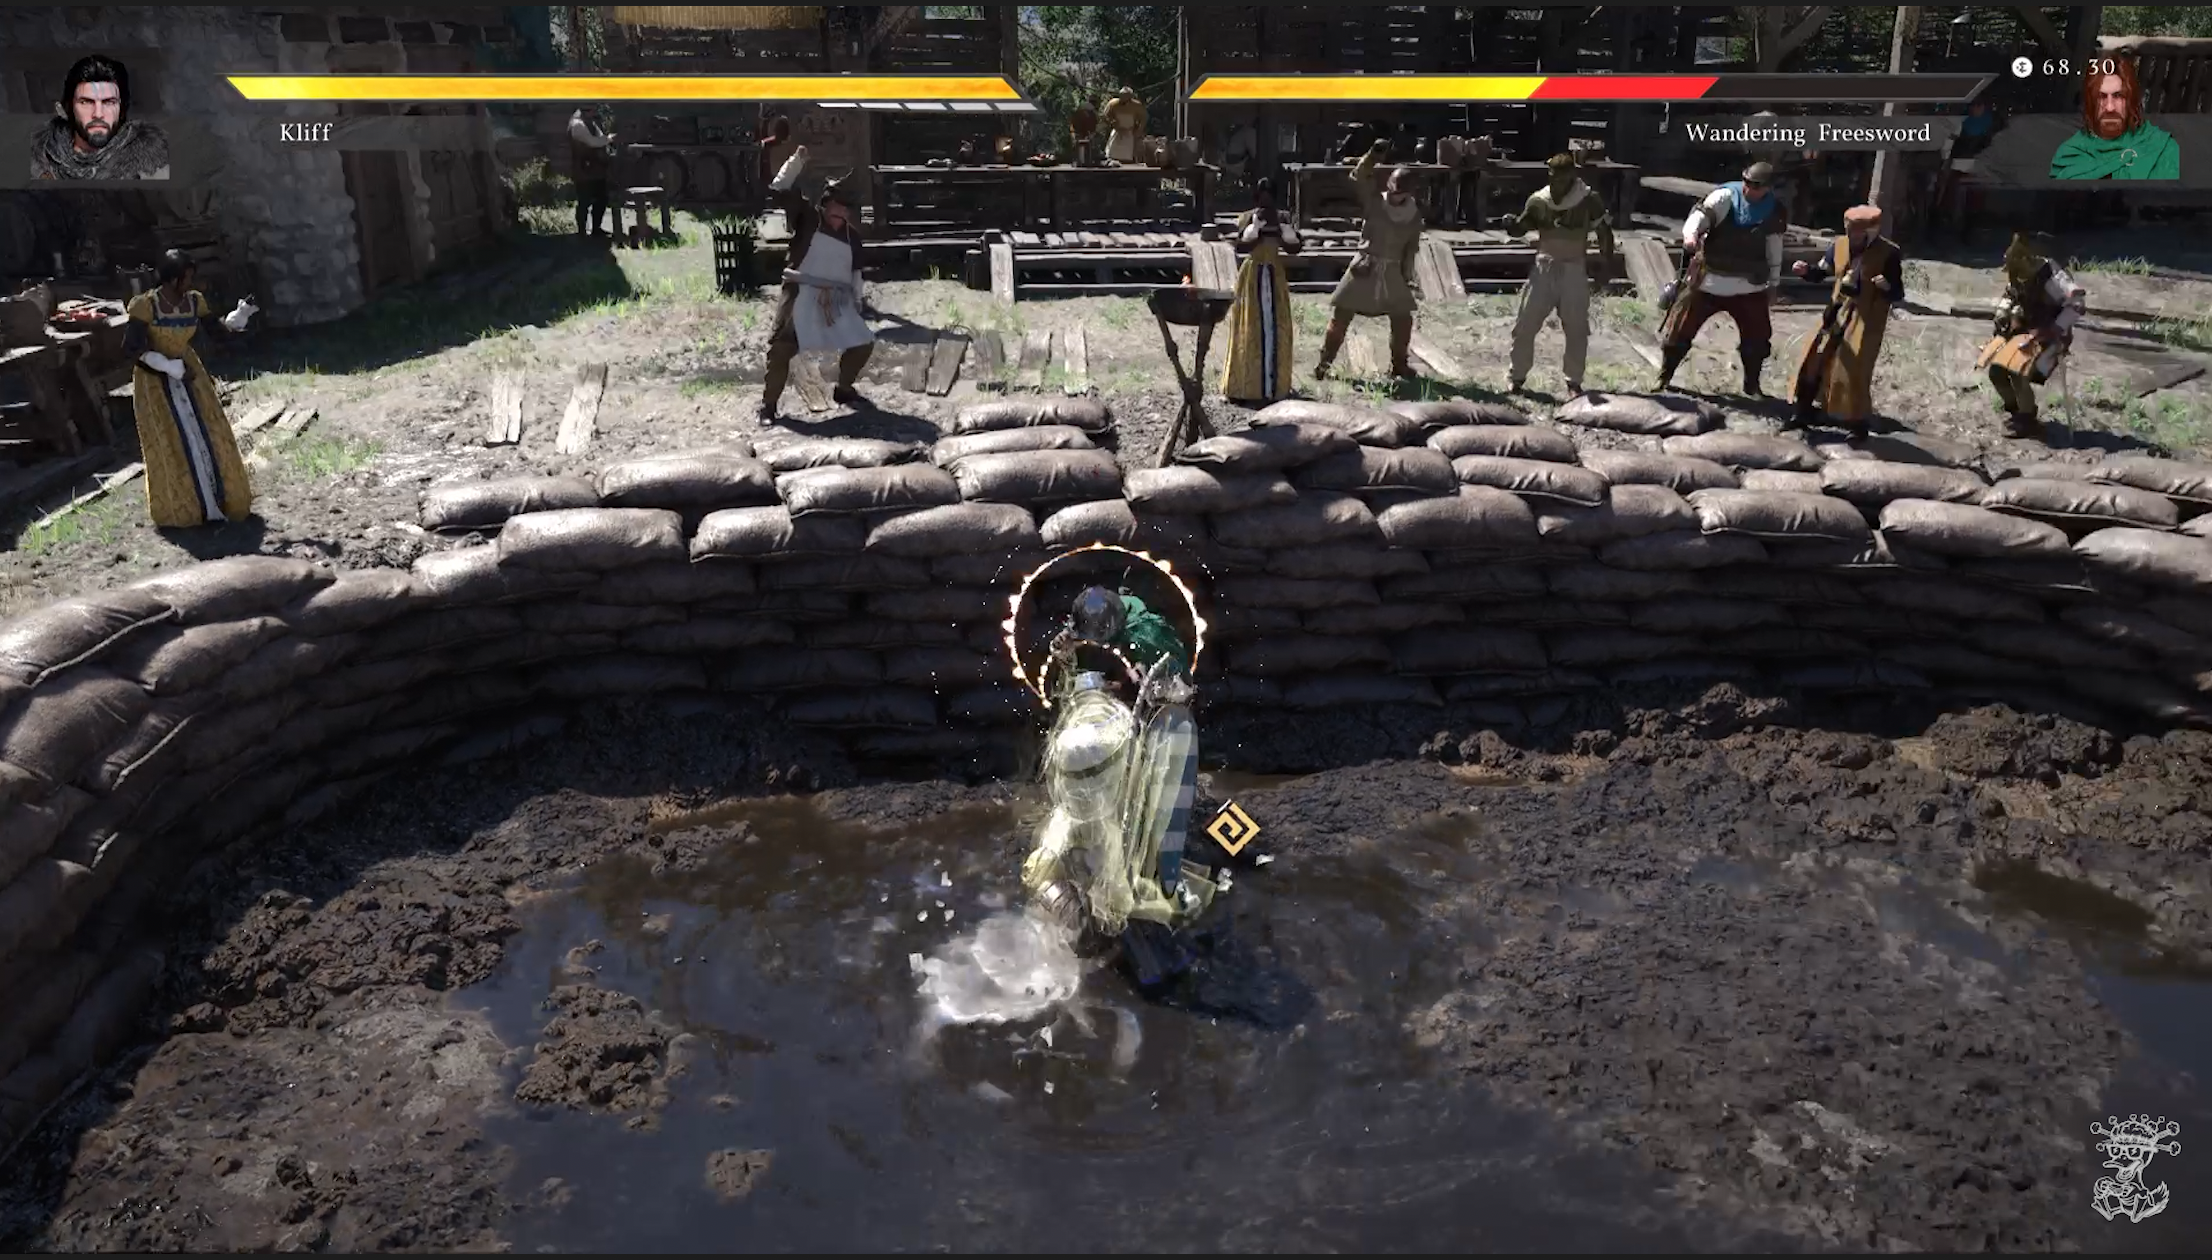
Once the cutscene is done walk on over to the arena and speak with the host. Use your lantern if you need help finding him, he’s marked on your mini map. Before talking to him make sure to equip your Ordinary Gloves for the fight.
Hold Left on the Dpad and aim to the top left. Then move left or right with the dpad until you select your Ordinary Gloves as your weapon. This makes you fight barehanded. If you still have a weapon equipped when you talk to the host he won’t let you fight.
Now the fun part. Win the fight 3 times against 3 different enemies to become champion and save Yan. The fighting works the same as with swords, R1 is light attack, R2 is heavy attack and L1 blocks. Just make sure not to use powers. If you accidentally use Force Axiom by pushing in on the joystick like I did, you can turn it off quickly without ending the fight, but if you use Force Push, it will end the fight immediately. Once you complete the 3 fights you can continue fighting if you want, or exit out and Speak with the Arena Overseer who you spoke to about releasing Yan to continue the main mission.
After releasing Yan, call your horse and wait for Yan to hop on the back of it. Then ride back to camp.
Skilled in Archery
As you get back to camp Yan explains how Naira has been talking about an archery contest and how she could beat him with her eyes closed. He then says he’s basically too hungover to compete and you should do it and beat her.
Make your way back to Hernand Village and head south to the mission point. You’ll find Naira by a cooking pot near the beggar territory. Shes talking crap to Duane about how much he sucks at shooting a bow and how amazing she is.
Once you’re back in control, hop on your horse and follow Duane to Lioncrest Manor for the Archery Contest. Duane will tell ask you to compete for him cuz he knows he can’t beat Naira himself.

Walk up to host and begin the Archery Contest. This one can be a little tricky but they have made it easier via one of the patches post game release after massive complaints.
Have your bow ready and leave your cross hair in the middle. Then wait for the targets to pop up and hit them as fast as you can. Don’t worry about your accuracy as far as the target is concerned. Getting a bullseye or just hitting the edge of the target gives you the same points, so just focus on hitting the target as fast as you can.
There is a side quest challenge (Hawkeye) to win the archery contest 3 times in a row, but for this main mission you only need to win the one time. So once, you’re done competing, walk over and Speak to Duane.
Duane is going to ask that you head to Hernand and do some odd jobs to make money for the camp.
The Words of Alustin

Head to Hernand and find the person in need of your help. Just go to the X on your map, and pull out your lantern until you find the Noble with an exclamation mark above his head and speak to him.
He explains a fishing ground hasn’t been getting as many people lately so he had a statue built of the Goddess of Plenty to try and help. This actually isn’t even the main mission, its a Faction Quest you can handle later. But, after you speak with him, someone runs past you and it seems like they robbed you but they actually left you with Alustins Letter.

Open your inventory and find Alustins Letter.
Push X to use it and then Hold L1 to Learn it. The Letter is asking you to head to the Scholastone Institute, a place devoted to knowledge. They are asking that you go to institute to help with somthing unusual.
However, they explain you can’t just walk up. You need to first go the the Hernand Fence and get the Scholastone Attire and then find your way through the dead end using the power of nature to actually find your way to the institute.
Scholastone
Head over to the fence, follow your mini map and look for the building is right next to the Bounty Board in town. Once there, head upstairs and speak with the fence, Darroch.
During the cutscene you will tell him that you are looking for what the alchemist left for you. Darroch then makes everyone leave the room before giving you the attire you need to gain entry to the institute.
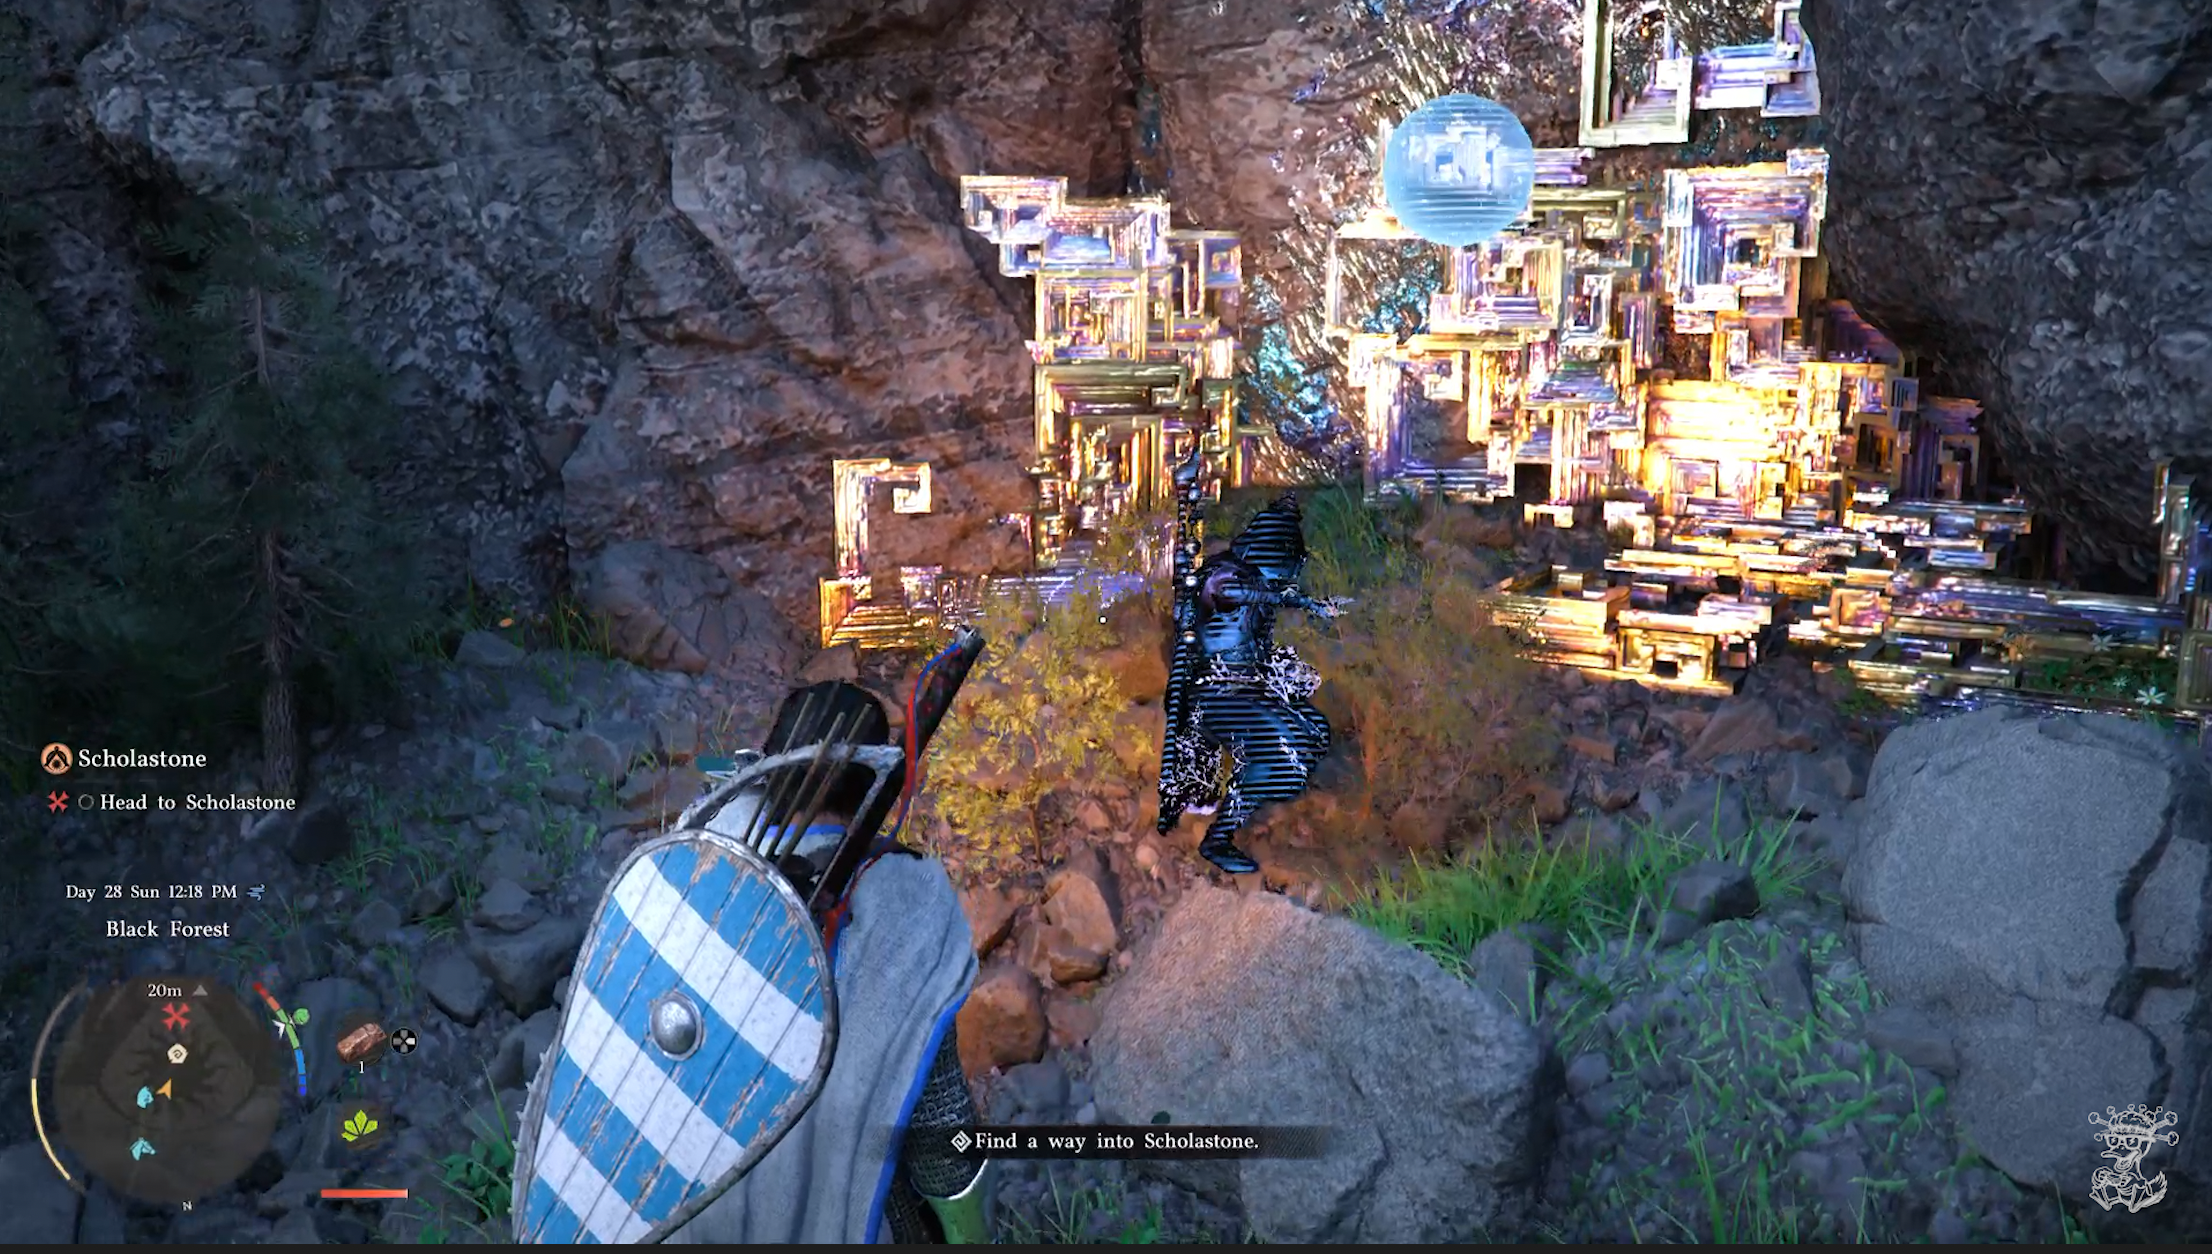
Now that you have the attire, head to the X on your map however you’d like or follow along our video. Once there, you will need to Find a way into the Scholastone.
To do this, observe the blue spirit with your lantern and learn Focused Force Palm. Now you can enter Focus mode by clicking L3 + R3 then once in focus, Hold R3 and aim wherever you want to shoot then release to shoot a stronger version of force palm and clear the path ahead.
You have to shoot all the elements off then you can shoot the wall itself to blow a hole in it and head through. After the wall collapses make sure to use Axiom Force and Seal the Abyss Artifact into your new Kuku Pot. Go through the hole you just made and find another wall blocked, do the same thing and then you will finally be through to the path to Scholastone.
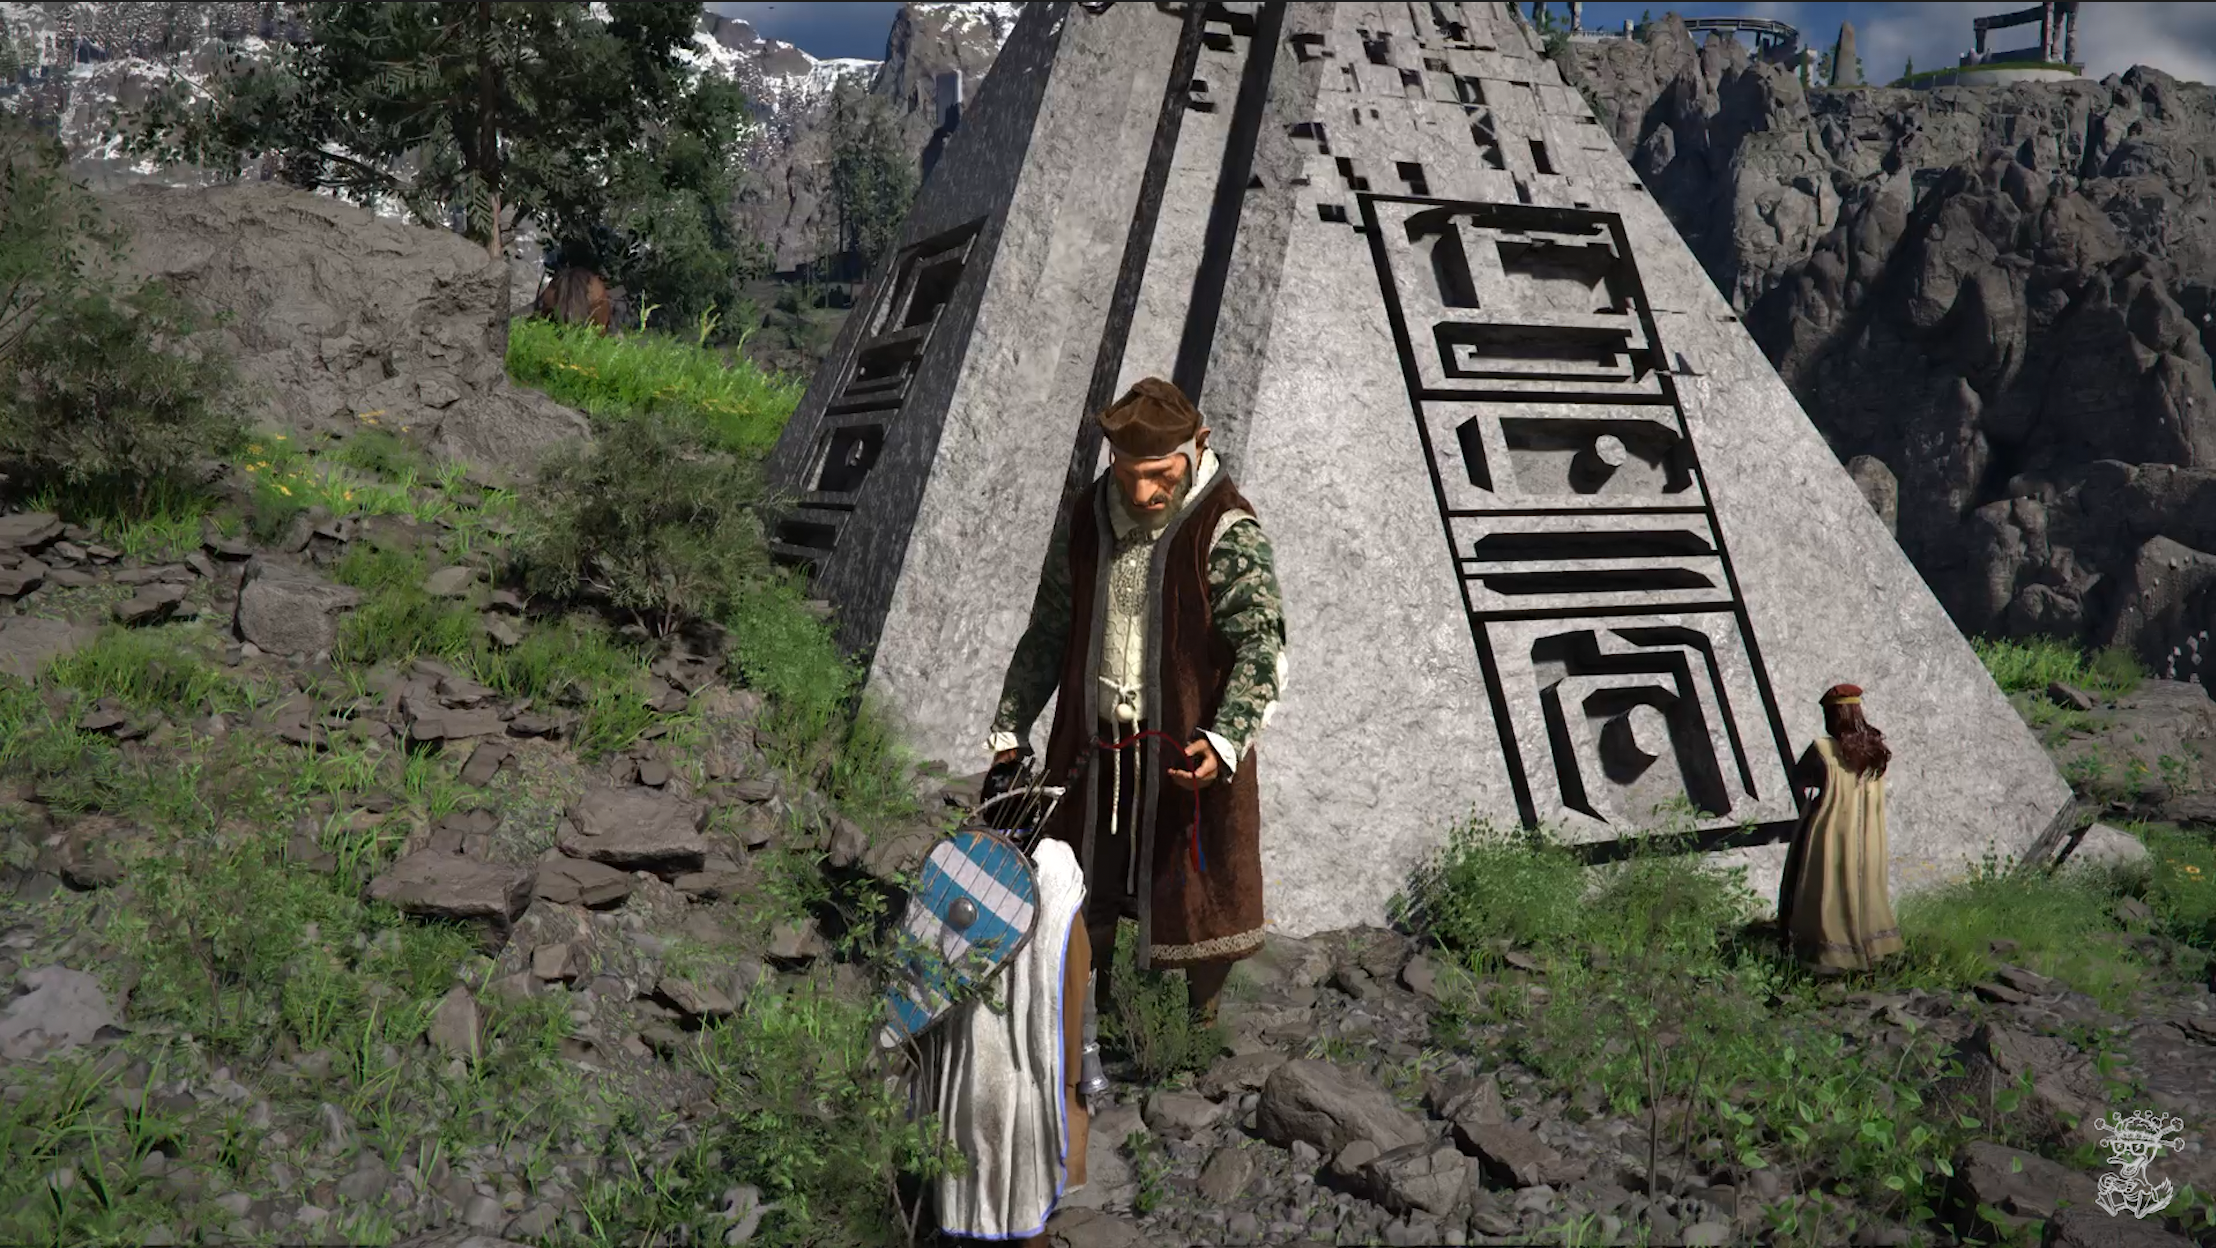
Once you make it through, continue forward up the hill to the X on your map and Speak with the scholar, Grimrick, wearing the scholastone uniform. Open your inventory and equip the Scholastone uniform, he won’t speak to you unless you’re wearing it.
Kliff tells the Grimrick he needs to speak to the dean. Grimrick asks you to follow him and he’ll show you the way. Follow the Troll and he’ll bring you up the hill and show you 2 different ways to get to the Scholastone Institute.
You can either take the road or climb the mountain. In our video guide, we follow the road and get an Abyss Nexus, and stop at a few vendors along the way for later.
On the Right Path

Once you make it to Scholastone Institute you will need to find the dean. Just follow the X on your map up the stairs and find him standing outside speaking to a couple other people. Get close enough and a small cutscene will begin where he explains he has been studying the Abyss above and the ties between it and the normal world.
Once the cutscene is done, Grundir will ask you to follow him. Remember you can hold X to follow people while walking not just on horseback. As you Follow the Dean, he’ll explain how most cannot enter the Abyss and you tell him that you have before and that it is filled with strange energy. He’s bringing you to Octavius who has been studying the Abyss and is in the middle of an experiment as you walk up.
Gate to the Other World

After the cutscene, you actually need to wait until its time for the experiment to begin. Wait a few seconds and an hourglass icon will appear on the right of your screen as part of the side menu. Just push pause, or hold and move to the one that says WAIT, to wait until its actually time to start the mission.
Now everyone is gathered around and you can walk closer and listen to Octavius for a few seconds before helping get things started. Now in my video guide I actually do things out of order, but it doesn’t matter either way you do the same steps. So if you’re following along my video we are going to head to each pillar surrounding this big dome in the middle.
Next to each pillar, is an electrified cube. Use Axiom Force and grab the cube and then place it in front of the square hole on the pillar. Then release Axiom Force and push it in with Force Palm. This will fit the cube into the square space on the pillar and you will see it activate and a laser will start shooting into the big dome. Do this on all 4 of the pillars surrounding the dome.
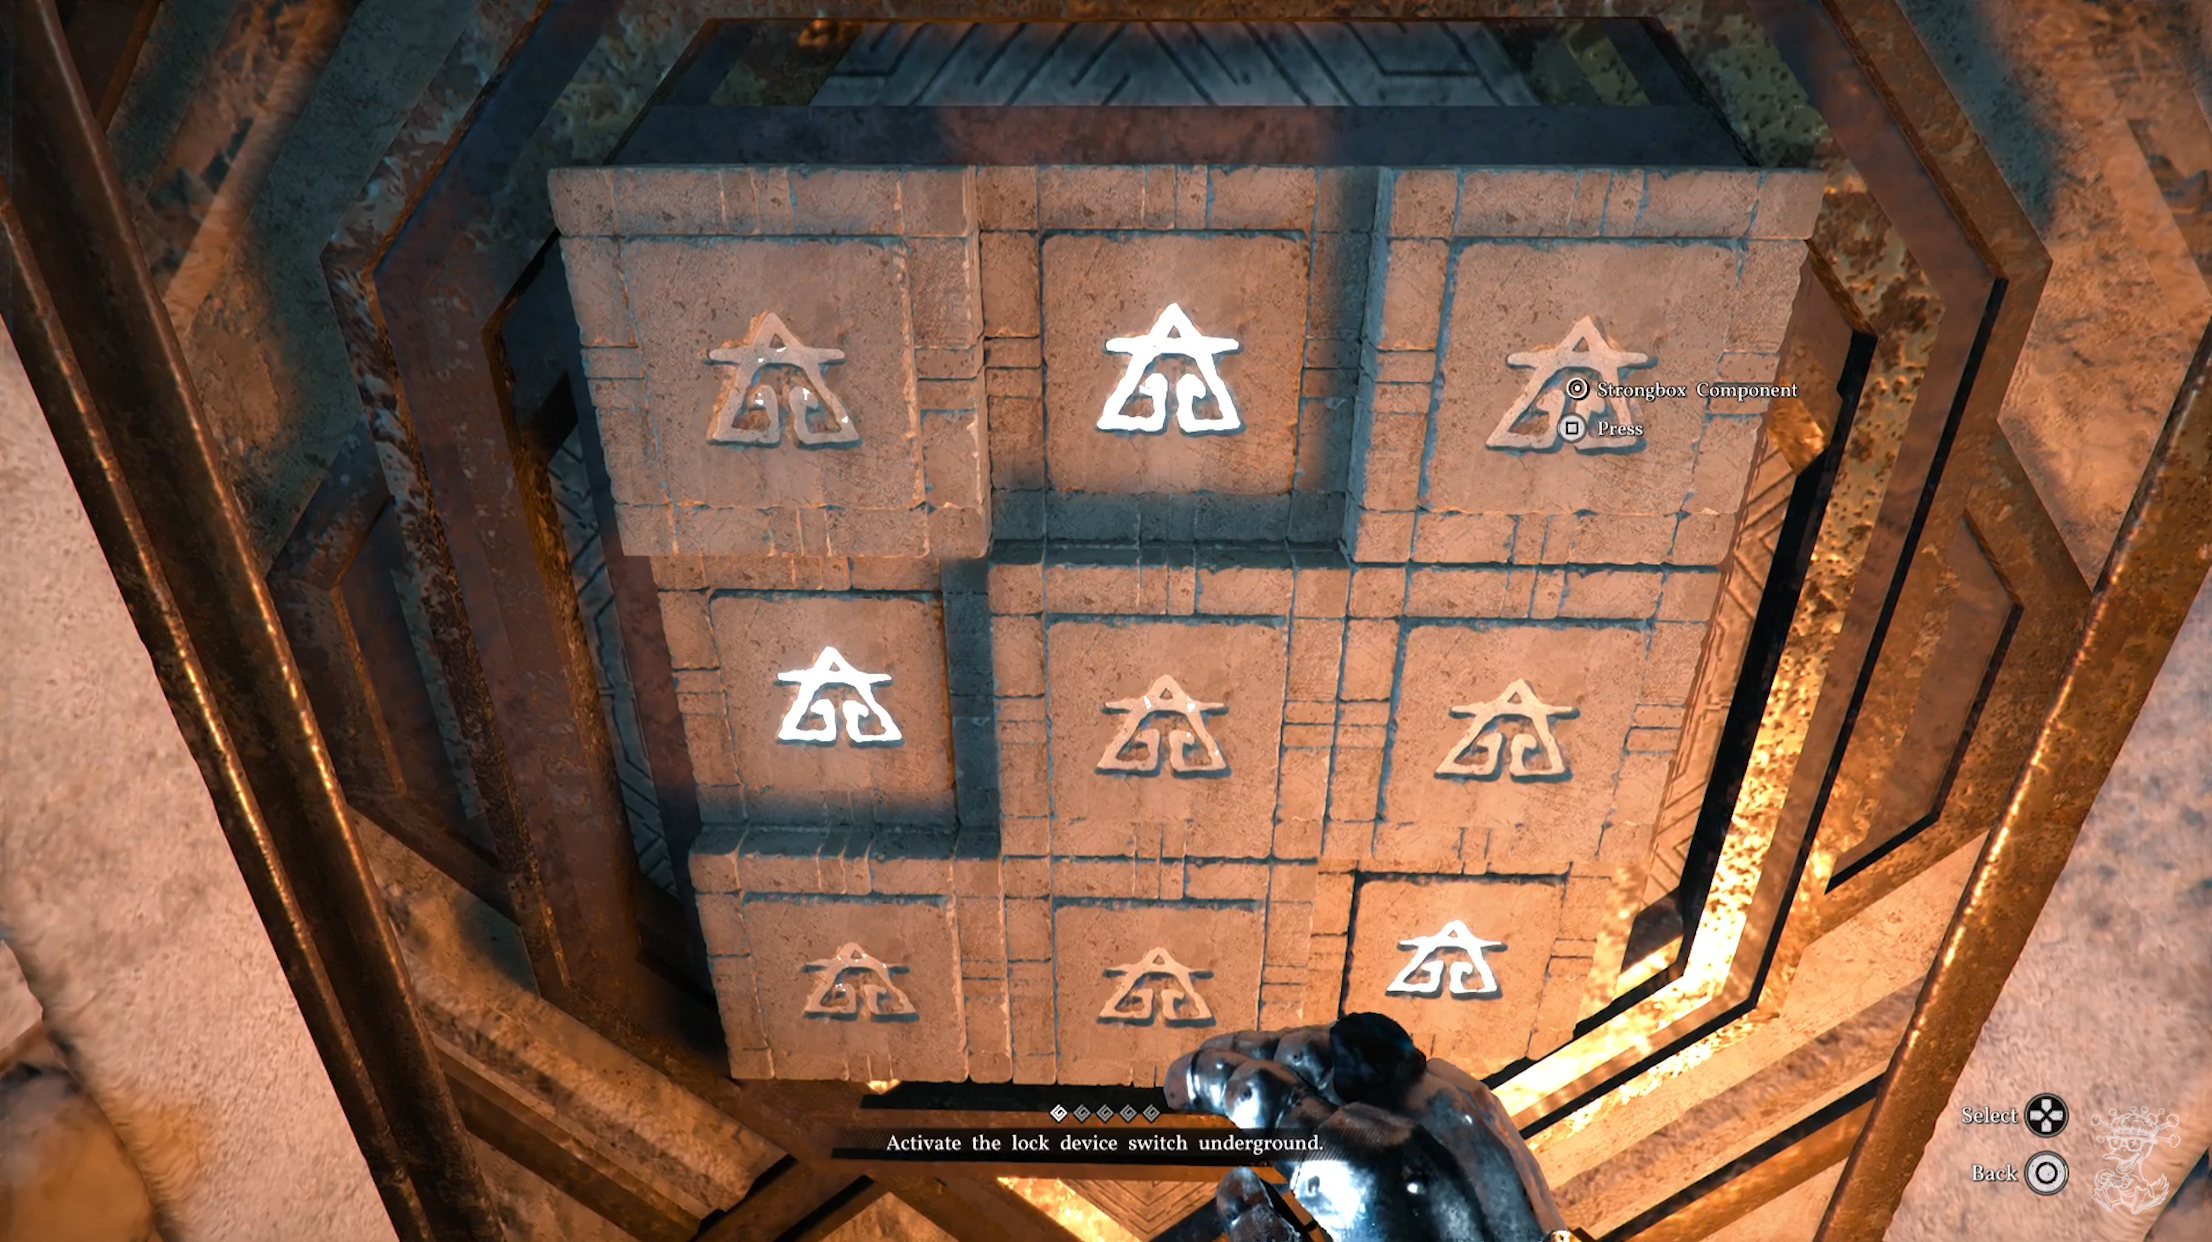
Now, from where you started and Octavius is, go to the right of the dome and follow the concrete path, it will take you below the dome to activate the lock switch underground. Once you’re down below walk up to X on the mini map and find a hatch that you’ll need to open. To open it you have to solve a puzzle which can be a little annoying. Every time you push one square (Strongbox Component) other squares become active. So you need to push them in the right order to activate all the boxes at the same time. If you’re having trouble, follow my video guide to finish the puzzle in 5 steps.
Check out my video to do it in 5 steps. Once you’re done, the hatch will open revealing a handle that you must use. Just push Square and it will activate starting another cutscene. If you do this part first, you will now need to go upstairs and activate the cubes, but if you’re following along my guide a cutscene will begin and you will appear upstairs afterwards.
In the cutscene Octavius tries to use his machine and things immediately go wrong shooting lightning everywhere and Octavius appears to be consumed by power and is very angry. You try to have him shut it off but he won’t listen.

Once you have control, you need to use Axiom Force to remove the unstable core. Grab the blue orb using axiom force and pull it off its pedestal. Once you do another cutscene will begin and Octavius gets sucked into the blue orb which then explodes immediately after almost killing Kliff.
A ball of black smoke (The Tenebrum) then appears and starts shooting black magic at everyone nearby. Kliff dodges a few shots and then you gain control and the game immediately triggers you to hold L1 + R1 activating blinding light.
You now have a new power with blinding light, Blinding Flash. Once its triggered with L1+R1 you can now hold R1 to reveal hidden weaknesses on enemies. Use this new skill on the tenebrum and you’ll notice a green leaf looking icon on him. This is telling us that the black smokes weakness is Force Palm.
You'll now notice there is a big wind drift happening which you will use to your advantage. Jump In the air and start to fly and the air will keep you afloat so you can fight the tenebrum

Fly around and hold L1 to help lock onto the smoke, then get as close as you can. Once you’re close, push R3 to use Force Palm and deal damage to the smoke. You’ll have to do this a few times and it can be a little annoying but the smoke actually doesn’t do too much damage it just seems like it because kliff is constantly getting hit, but the hits don’t do much.
Once you defeat the Tenebrum, a cutscene will begin and Spire of the Stars shoots a bright light into the sky and then disappears. Then the dean walks in blaming himself for everything that has happened. He asks that you investigate what is happening at the spire. Before you walk away, an artifact appears where you’re standing. Make sure to let it appear and walk into it to absorb it before leaving as this will trigger the net mission.
Spire of the Stars

We now need to Go to the Spire of the Stars. In my video guide we go into the institute really quick to grab some gear for ice resistance and a recipe to make Platinum. But you don’t have to do this, you can just head straight to the spire if you want.
If you’re following my guide, were now going to leave the library on the east side and make our way through a big dining hall that leads out of the building where you will find a path leading to the spire.
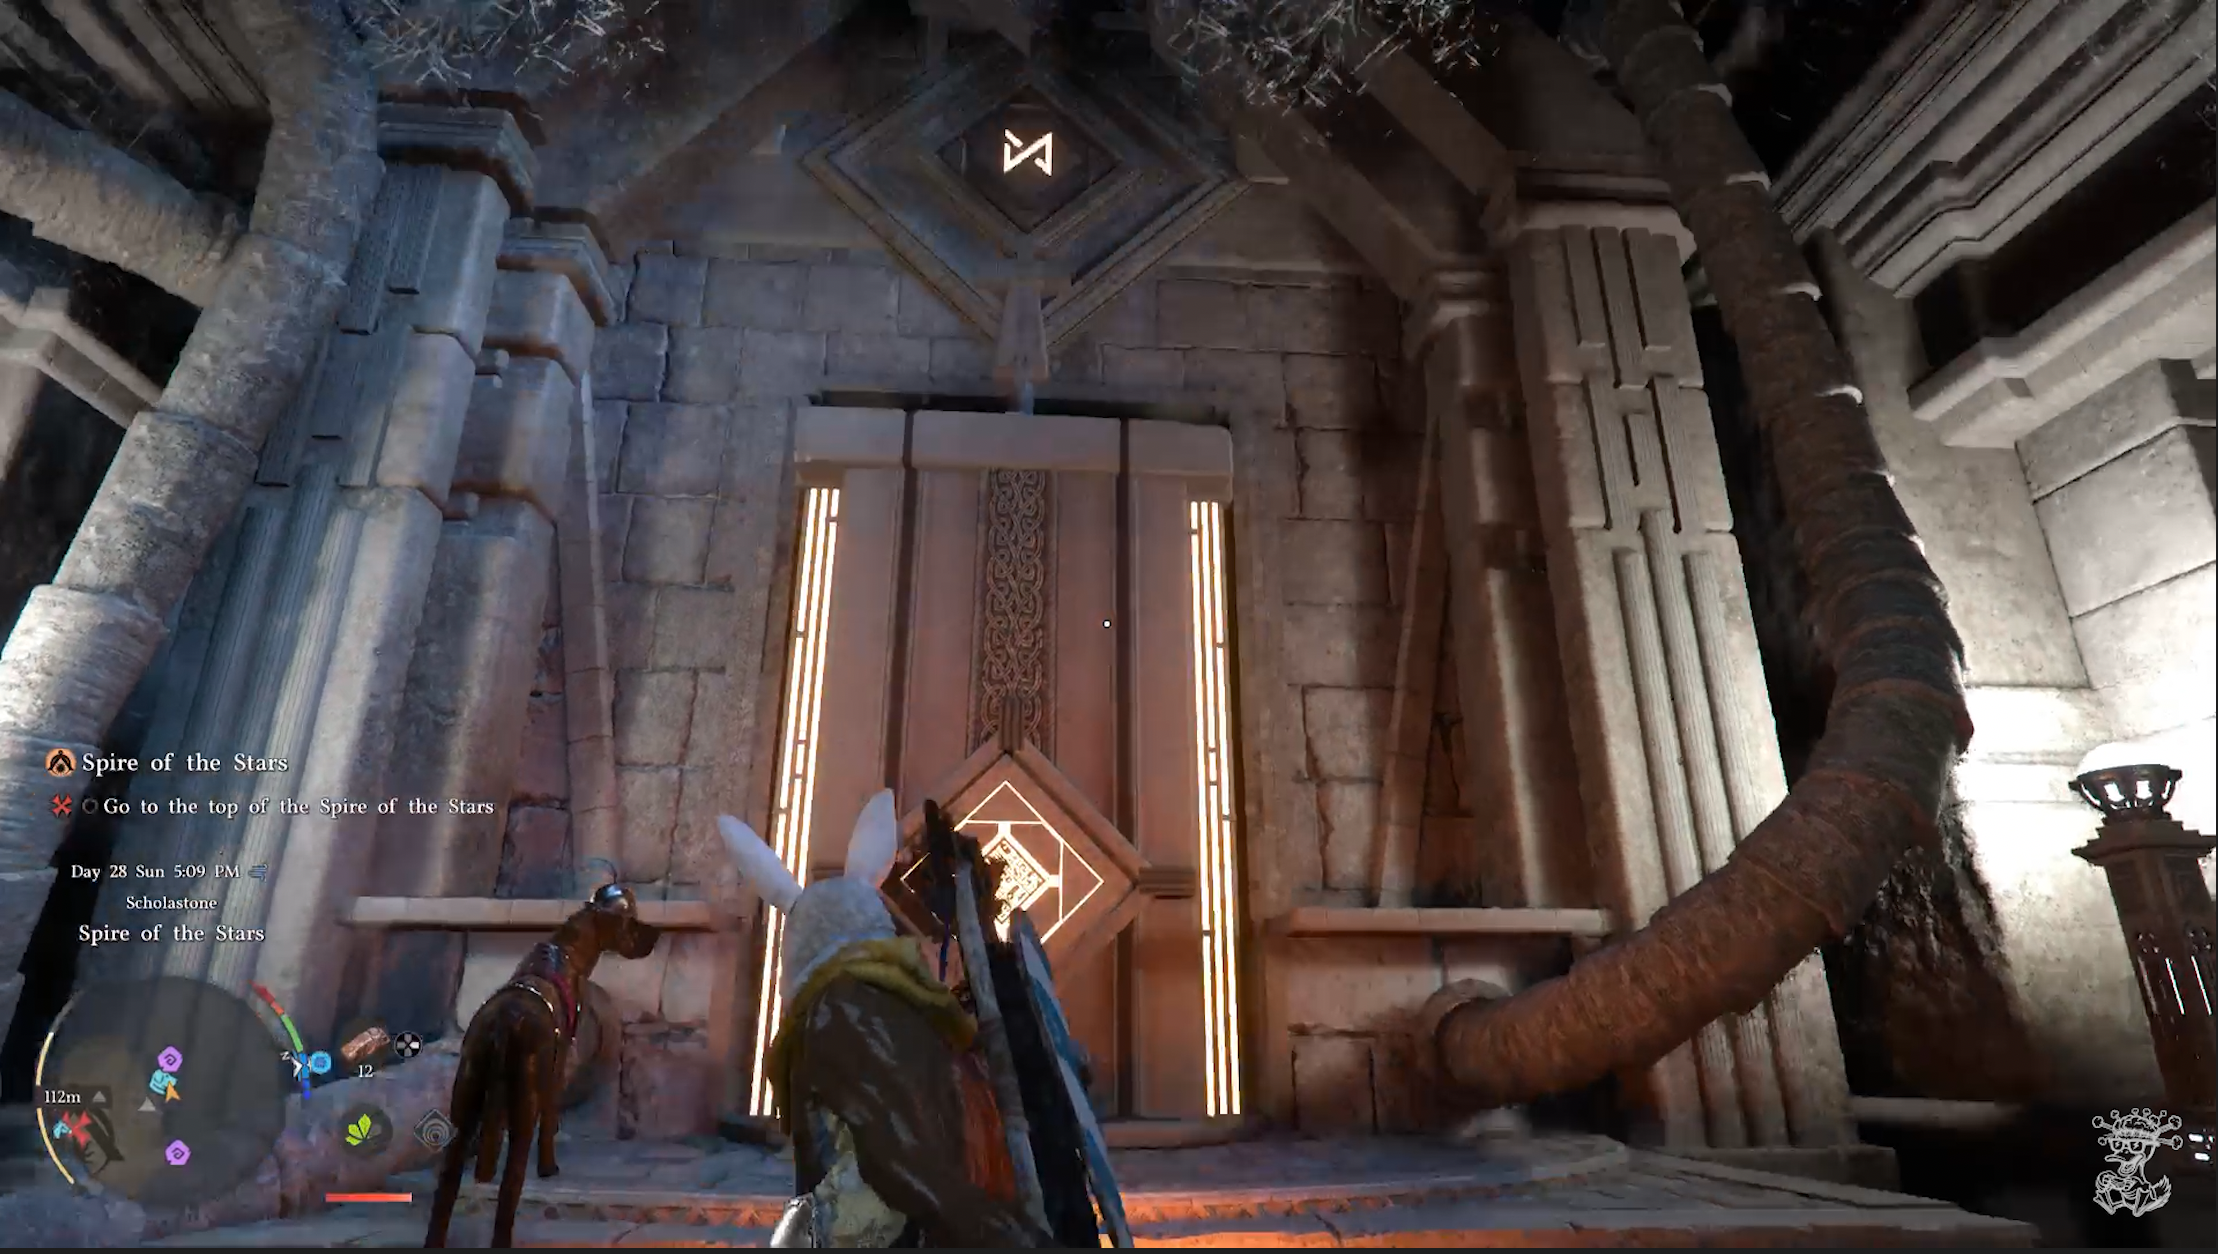
Follow the path up the stairs leading you up the mountain through a cave and back out to the mountainside again until you finally reach the Spire of the Stars. You’ll notice your kliff is getting cold and ice might appear on the top edge of the screen, don’t worry about it, it’s not cold enough to actually hurt you. When you get to the door of the Spire you will use the Abyss Artifact you grabbed and use it to Enter the Spire of the Stars.
Go to the top of the Spire of the Stars
Now that were in the spire we have a pretty fun puzzle to solve. Either follow my video guide or follow along reading here and I’ll do my best to explain it.
There are 3 main sections of the puzzle. From when you walk in there is the Main Wall in front of you with 4 symbols and 4 devices with handles that you will use later. Then on your Left there is a spot we will just call Left Room and then a similar spot on the right we’ll call Right Room.
Head over to the right spot and you’ll see a wall with 2 symbols at two different positions on the wall. If you look at the main wall, this is actually telling you where those symbols should be height wise on the main wall. But to get them into position, first we have to activate them. Look around the room and you’ll see to either side of the wall with the 2 symbols a wall with a button looking thing on it pictured here. If you use your lantern you will see a cable with blue lines going into it.
Walk up to the button and use Force Palm to push it in activating the device. It will spin around and release an engraved stone that you are going to use in a second. Do the same thing in both rooms and collect 3 engraved stones. You won’t need to do all 4 as the Cirlce Symbol is already in position.

Now that you’ve completed the puzzle, walk to the middle of the room onto the circle platform. This is a lift that will take you towards the top of the spire. Once the lift stops, get off and run up the stairs until you reach the top of the spire and Head to the Abyss.
Once you have them all, head back to the main wall and insert each engraved stone into the slots with matching symbols on them. As long as you have them, Kliff will automatically insert the correct one, so just walk up and push square to insert them. Every time you insert one you will see the the mechanism with the handle will shoot up to to the ceiling.
If you look close, you’ll notice there are 4 positions for these mechanisms to be at. Look at the wall in the left room and right room and match each symbol to the position it shows in these rooms to the main wall. To do this, just jump or climb your way up and grab onto the handle. The mechanism will then fall level by level and when it is at the correct position, just let go or jump off leaving it in position. Do this with all 3 symbol, (Circle is already in position) and you will have solved the puzzle.
Obsession and Madness

Once you’ve entered the Abyss, you’ll see Octavius on the ground ahead. Walk up to him and a cutscene will begin. He tells you to “Stop Him tearing open the rift” before disappearing into the abyss.Walk forward and stand activate the Abyss Nexus. If you check the map, you’re now in the Abyss at the Sanctorum of Insight.
From the Abyss Nexus, walk straight ahead and jump your way up onto the floating platform in front of you. Then do that one more time to get to the final platform. Once you’re there, run up the stairs and find the circle platform that is getting shines one by the light.
Stand on the platform and jump, then Force Palm to activate the switch, and Restore the Abyss. Wait for it to be restored and a couple cutscenes will play. It’s pretty long so check it out here.
Cast Shadow
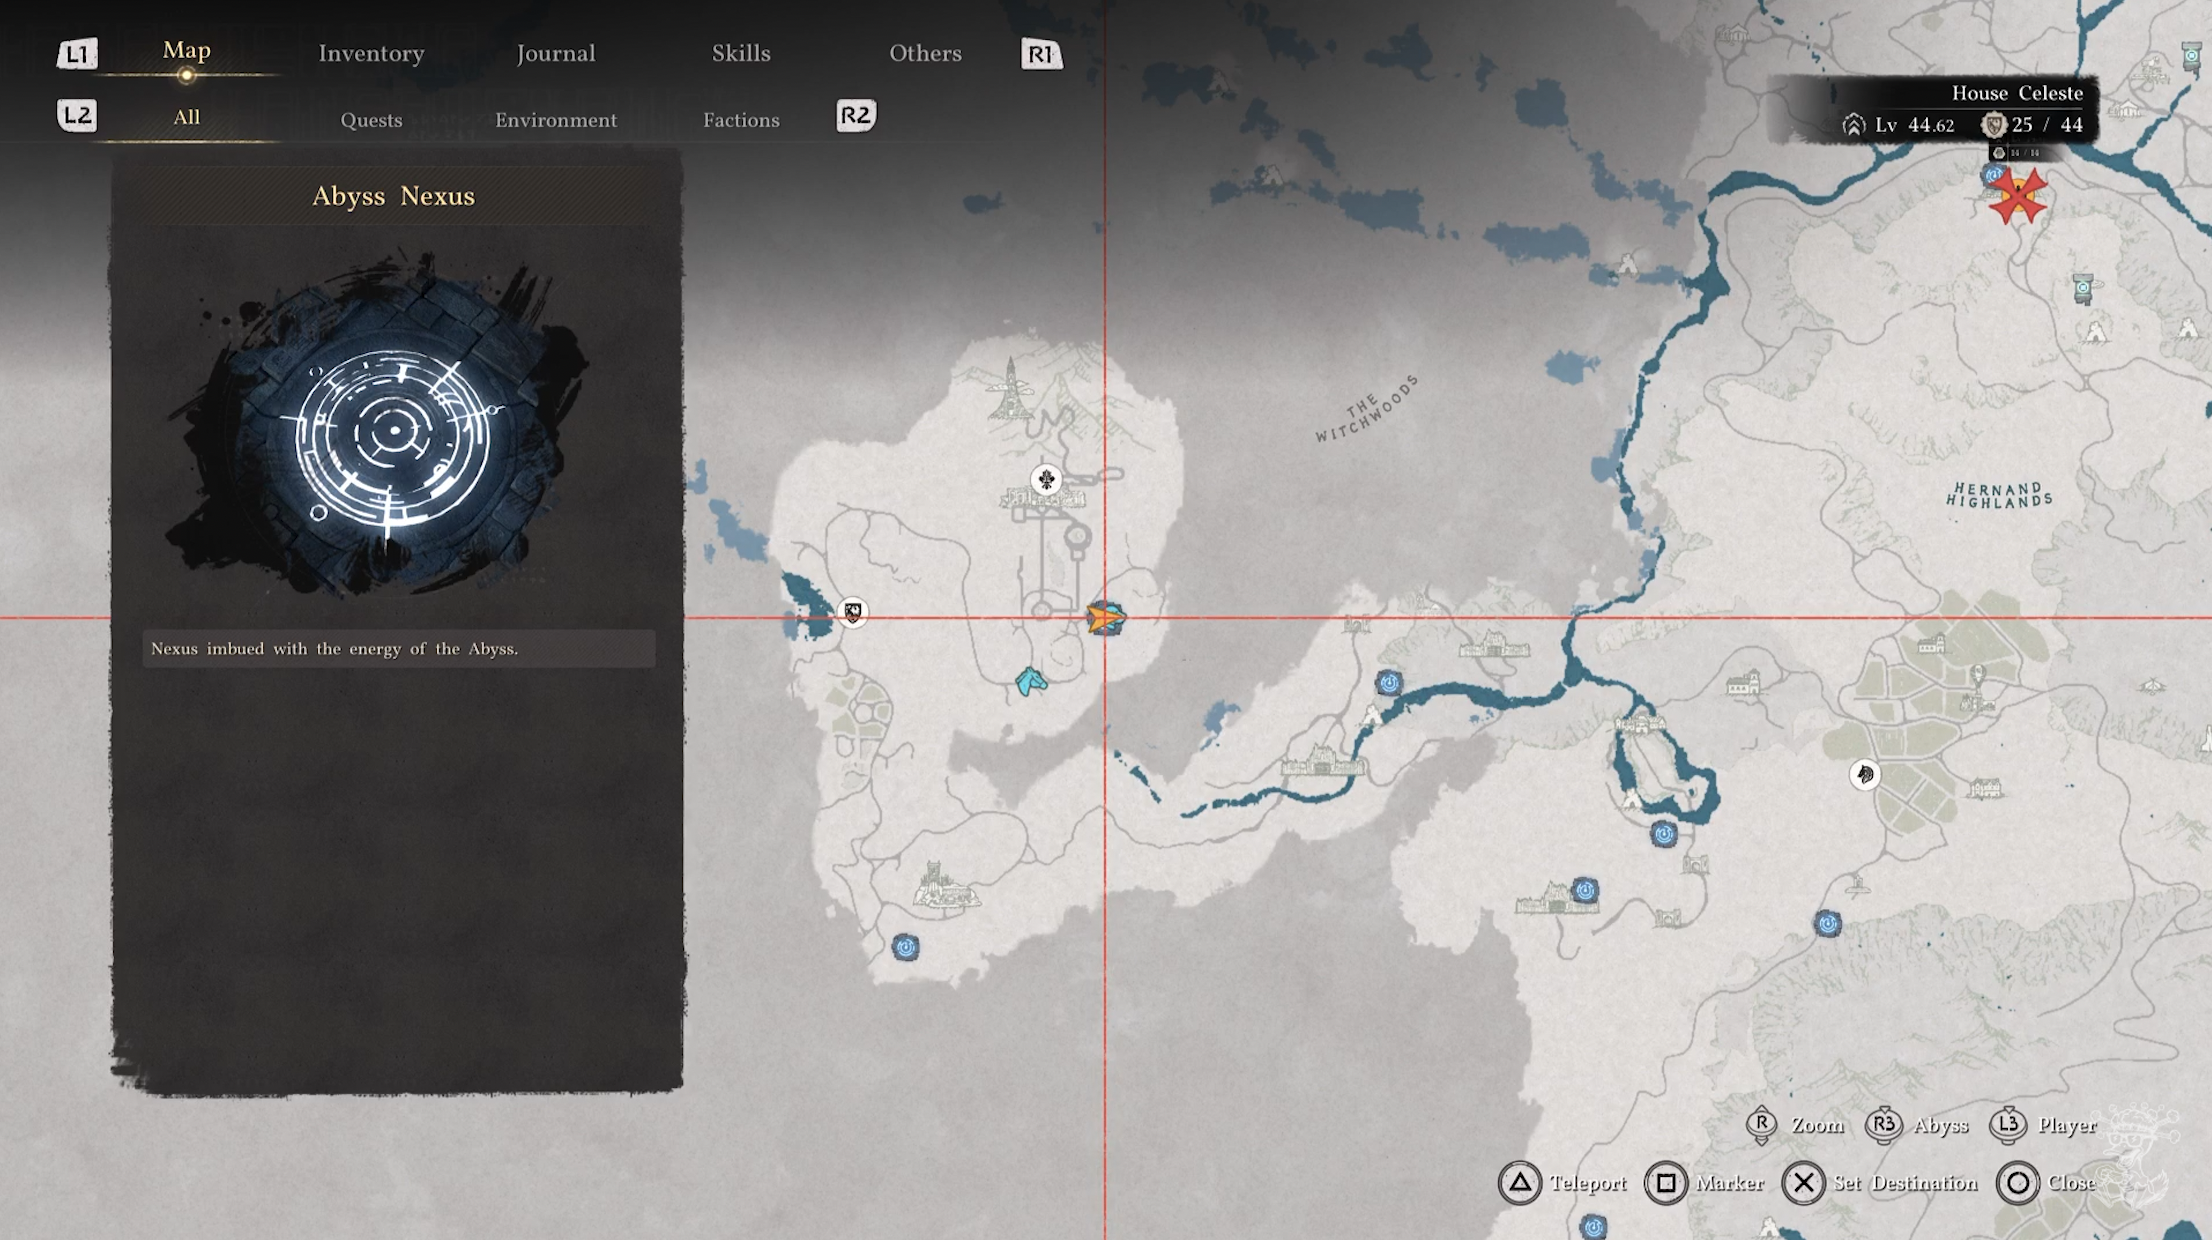
Now that everything is done, Kliff needs to return to Howling Hill. But before you do, make sure to get the Abyss Nexus so you can easily return to the Scholastone Institute. If you run straight from when you get control towards and jump off the left corner of the level you are on, you will see the Abyss Nexus down below on the grass.
Once you’ve gotten the Abyss Nexus, you can either go explore or head back to Howling Hill to complete Chapter 4. When you get back just walk up to your tent and the final cutscene of chapter 4 will begin. Check it out the video here.
Thank you so much for checking out this guide I hope it helped you. If you have any questions or comments please reach out and let me know. Happy Hunting!
Thank you so much for checking out our first complete guide.
Everything you see is done by one person with a normal full time job so things are taking a little time and I really appreciate you checking this out. If you liked this guide please give me a follow on youtube and hit me up on social media if you enjoyed this guide or you have any comments to make it better. More guides coming soon!